Category: Guns & Stuff

  • It’s just a matter of time……

    It’s just a matter of time……

    The House of Representatives is heading to be controlled by the gun-control friendly Democrat party. A new round of elections in the Senate, as well as the Presidential election, will be taking place in 2020. Nothing is certain as to the outcome. There is no better time than now to stock up on full capacity magazines, firearms, and ammunition. Prices are incredibly low and all it takes is a look back to after the Sandy Hook shooting to remember how prices can skyrocket and supplies dry up with the threat of gun control legislation.

    Recommended steps:

    • stock up on quality AR magazines (PMAG’s 10 for $99.95 – LINK)
    • stock up on normal capacity pistol magazines greater than 10-rounds
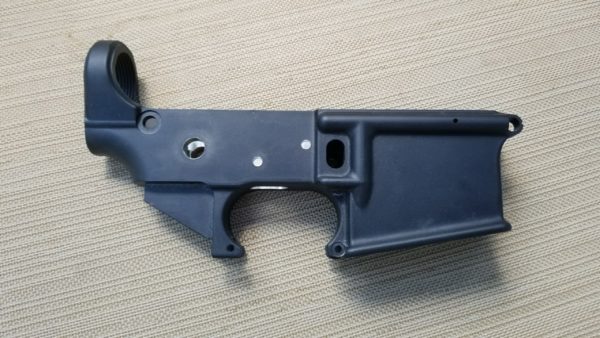
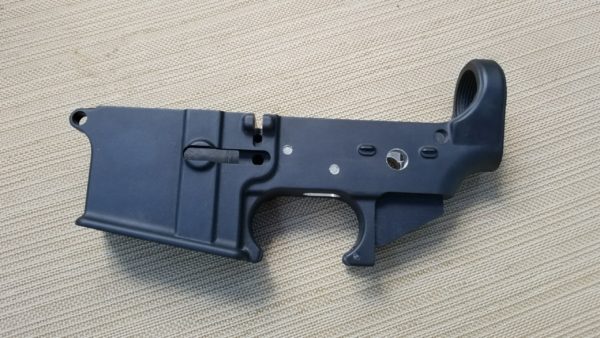
    • stock up on stripped AR lowers and/or complete AR lowers(LINK)
    • stock up on ammunition(1000 rounds .223/$301.38 – LINK)
    • purchase firearms “off the books” with no traceability to you

    This is not fear mongering. Stocking up now is merely a commonsense approach in response to what is very possible. If not in 2020 it’s only a matter of time before the next gun control scare takes place.

    Rourke

  • How To Make a Rifle More Accurate

    How To Make a Rifle More Accurate

    Note: The following is a guest post submitted by “Brent”

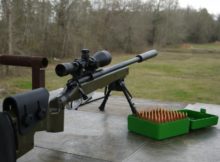
    In the recent times, shooting has become a huge trend. Whether you are a professional shooter or prefer shooting as a sport, the basic knowledge about the rifle is a necessity. Though shooting is a thrilling activity, the same requires strength and efforts especially carrying the rifle, aiming the target, and operating the weapon is not that easy task. The efficiency of a shooter also depends upon the accuracy of their rifle. An inaccurate rifle can turn out to be the major cause of your miss shots and the wrong aim. Whether you are opting to buy a fresh rimfire scope or desire to repair an old airgun, the accuracy of a gun is the key factor that should be considered before opting for a shot.

    Now the question arises “how to make a rifle more accurate?” there are various things that have a negative impact to the rifle’s accuracy among which some of them can be easily sorted by the shooter while other require the professional assistance. In most of the cases, the old guns are observed to be less accurate as compared to that of the newly bought model. This mainly happens because the shooters do not provide proper maintenance to the gun making it hard and filthy. This dirt and filth obstruct the rifle to operate and aim the target or place the shot. Although the maintenance issues of a rifle can be easily detected through the visual inspection, in other cases such as the improper functioning of the gun, you might require hiring a professional for repairing the gun. If you desire to maintain the accuracy of your rifle in the easiest yet effective way then here are the major components that require proper care.

    How to make a rifle more accurate?

    In order to maintain your rifle and ensure the proper functioning of the same, follow the below-mentioned tips and observe the changes.

    • Barrel, Muzzle crown – Muzzle is the ultimate portion of the rifle that has the major influence on shooting the target. Whether you install the muzzle brake and sound moderator in the rifle or not, even a small destruction and corrosion can affect the accuracy of your rifle negatively. Since the path of the bullet is determined by the Muzzle, the imperfection in this spot can be a major loss.
    • Throat – throat is the spot located at the chamber end of the gun. If your rifle is not working appropriately then the damage in the throat section can be the reason behind it. The damage in this part may occur because of the great pressure produced after the bullet or due to obturation (a state when bullet swells and doesn’t fit the barrel). This initial movements of the bullet lead to the extreme wear of the same causing it troublesome for the shooter to move the bullet up the barrel. Though the cartridges can be refilled and loaded if the issue is minor, you might be necessitated to re-barrel the rifle if the problem continues.
    • Rifling erosion – the rifling erosion is mainly caused due to improper maintenance of the rifle i.e., not cleaning the same after operating it. If you do not clean the rifle, the copper (inside the barrel of the rifle) and the recurred residues of the burned powder would catch combustion chemicals and unwanted moisture from surroundings. This moisture deteriorates the metal and thus, the functioning of the rifle to a great extent. Apart from this, operating the rifle continuously without taking way the sound moderator from the same can also lead to the generation of toxic chemicals into the barrel. This then further leads to corrosion. The only way to get rid of the corrosion is to cut down the barrel. Since cutting the barrel is not an easy job, it is recommended to seek the aid of some rifle repair agencies to correct the issues. Moreover, you should always maintain the rifle by cleaning it and removing the sound operator after each session of shooting.
    • Bedding vibrations – the vibration sound is generally observed when the bullet exits the gun. The vibration of the gun should be uniform i.e., the shooter must not focus to obstruct the vibrating sound of the rifle as this may lead to the generation of inconsistent harmonics and thus, deteriorating the accuracy of the rifle.
    • Bolt handle binding – regardless of the type of rifle, there is a possibility that the bolt handle of your rifle gets attached to the stock leading to the obstruction in vibration sound during the exit of the bullet. In order to ensure the free movements of the bolt, it is advisable to eliminate the unwanted stuff from the binding section.
    • Accessories – apart from the bolt lugs, action, and stock or bedding, the loose-fitting and inappropriate accessories can also lead to the decreases accuracy of your rifle. Whether you are buying the scopes, sound moderators or are opting for the bipods, it is a must to buy the entire accessories from the reputed stores. Usually, the bipods should not get connected to the barrel as bipods lead to the generation of diverse kinds of pressure and hence, may make your rifle inaccurate. At the same time, the inappropriately fitted and heavy sound moderator can also damage the accuracy of the gun. So make sure to test it before fitting the same in the rifle.

    Conclusion

    If you are a professional shooter or have the desire to learn shooting then it advisable to learn the basics of maintaining your rifle. As the problems in the rifle can not only misplace your shots but the same would diminish the accuracy of your gun. These problems can be either in the action, stock, bedding, bolt lugs or the loose fitting accessories. The basic step in correcting the issue is to analyze the obstruction. If the issue is minor then try the DIY tips to correct it on your own. However, in case of a major deterioration, approach a professional person. In order to get rid of unwanted damages, follow the above- listed tips and safeguard your rifle.

  • Body Armor and Preparation

    Body Armor and Preparation

    Note: The following is a guest post from SafeGuardArmor.com

    Surviving is all about preparation. Adequate preparation covers self-defense, resource management, first aid, and a number of other skill sets. Keeping yourself safe is of the utmost importance when the situation changes and this starts with easily accessible products, such as body armor.

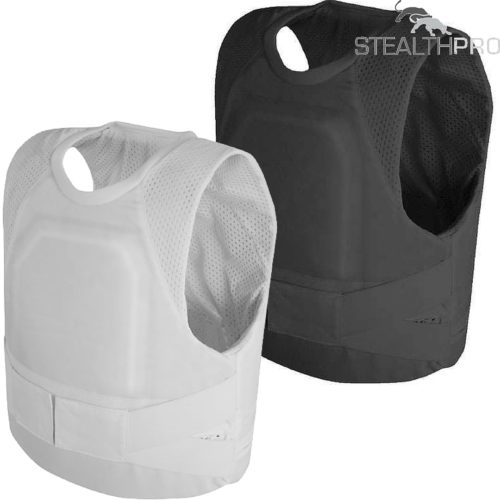
    Body armor comes in many shapes and types, but you should have a good understanding of what it can and cannot do for you in all situations. Essentially, no body armor is 100% bulletproof and different levels are only suited against the type of bullets they are tested against. This means that you should carefully examine the potential threats you are likely to face and choose your vest accordingly. For example, a bodyguard or security agent working in close proximity to multiple people will likely need a carrier with combined ballistic and stab/spike resistance.

    body armor,survival, prepper, preparedness

    When you think about survival, there are a number of situations that call for the use of protective equipment, such as:

    Dangerous urban areas high in crime

    Body armor is becoming a popular choice of civilians who live in crime-ridden neighborhoods. For the needs of untrained individuals, who don’t want to draw attention to themselves, a covert vest in level IIa is sufficient. It offers protection from 9mm FMJ RN 124gr/1090fps up to .40S&W FMJ 180gr/1025fps in addition to all Class I threats – 22LR, 40gr/1050fps up to .380 ACP FMJ RN 95gr/1025fps. It is worth mentioning that the 22LR is the most commonly used handgun in America. This is also a light vest and can be worn all day without causing discomfort of overheating.

    High levels of civil unrest, protests and attacks

    The economic, politic and social scenery of urban centers these days is rapidly changing. This requires civilians to exhibit a constant state of preparedness for the worst. Buying quality body armor is a safe(ty) investment that can be the difference between life and death. Although you should generally avoid any large gatherings of people due to the possibility for a terrorist attack and/or quickly escalating violent clashes with police forces – if necessary, it’s always better to be equipped with a protective vest in such situations. Level IIIa vests are lightweight enough to allow you to move quickly, but cover all weapons you are likely to encounter. In addition, they can be fitted with ceramic or metal plates to increase the level of protection if things get particularly bad.

    The bottom line is that no one can be sure whether or not they will find themselves in a potentially life-threatening situation at any given moment. Being prepared is part of the strategy to say alive and safe. Body armor can significantly increase your chances of survival both in your line of work and in an urban setting, but you need to learn to rely mostly on your skills, speed and ability to plan ahead. Use body armor as a supplement to your survival strategy and it will fulfill its intended use.

    That being said, if you are truly preparing for the worst, and you expect to face particularly extreme threats, you may want to consider a tactical vest. These vests, similar to overt vests, are worn over clothing and are more durable than covert body armor. They are extremely protective, offering upgrades to protect the upper arms, throat, neck, and groin area. Even though this type of armor is heavier and bulkier – it is unmatched in the level of protection if offers and will surely hold up in the direst of circumstances.

  • Are there guns that are best for woman?

    Are there guns that are best for woman?

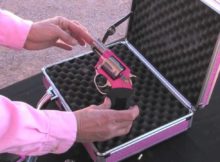
    There is no such thing as a handgun that is best for women.  Everyone regardless of gender has strengths, weaknesses, and preferences.  The old adage….“Just get her a revolver” is both an insult and dangerous. Far too often a woman walks into a gun shop with very little experience and is sold a revolver. I understand the concept, however, every owner of a gun should practice and train so they are capable – no matter the gender. Most women(and men) are perfectly capable of shooting Glocks, 1911’s, Sheilds, etc.

    So, why not treat a woman as a shooter rather than an incapable victim? The reason might be as simple as people are resistant to change. Come on guys, how many of us have dreamed of being the hero and saving the damsel in distress? To believe that women are just as capable of defending themselves may play physiological chess with your manhood, but it doesn’t change the fact that they are.

    The video below shows a competitive 13-year-old girl demonstrating that almost anyone with sufficient training can be very capable and proficient.

    Let’s stop recommending that cute pink pistol just to lure women into purchasing a firearm that is clearly not the best tool for the job.

    Now that I’ve stirred a hornets nest…bring it!

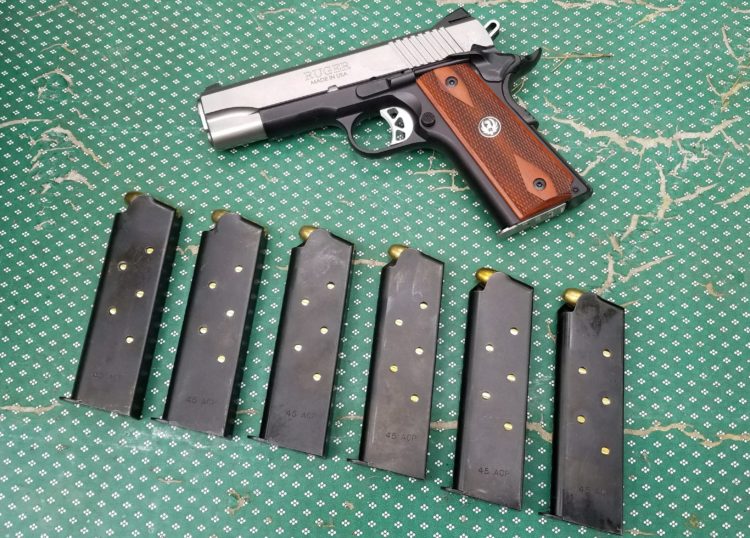
  • Hands On: Ruger SR1911 Lightweight Commander 45ACP

    Hands On: Ruger SR1911 Lightweight Commander 45ACP


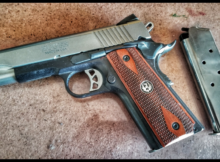
    With all the new offerings for defensive pistols on the market, one thing remains crystal clear: The 1911 is far from dead. Armchair firearms experts continue to boast the superiority of their choice thus deifying all others. OPtions are good and the 1911 has been a viable option for numerous decades. The reason why is obvious for those who have owned them. They are reliable, highly accurate, and shoot a cartridge that many feel is a superior manstopper.

    The most significant criticism that is fairly accurate for many is that 1911’s are heavy compared to polymer-framed pistols. Consider the Glock 17 9mm fully loaded at 32 ounces compared to a fully loaded full-sized 1911 coming in close to 44 ounces. When carrying as a duty weapon this weight may not be particularly significant. When carrying concealed and living everyday the extra weight may not be welcome.

    Enter the Ruger SR1911 Lightweight Commander.

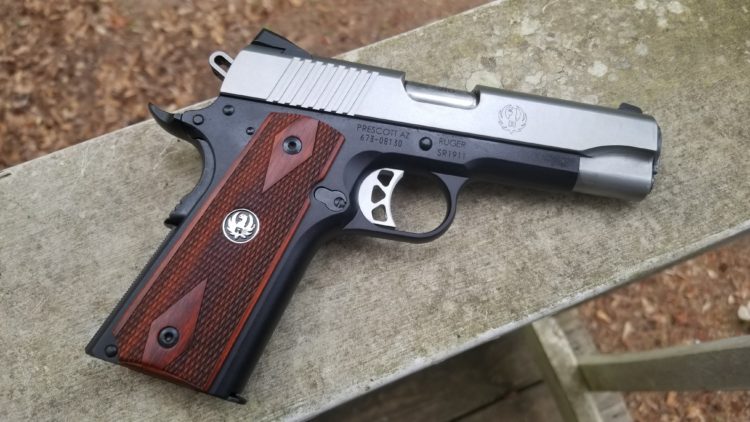
    Ruger, known for extreme reliability in their firearms, is producing the Lightweight Commander version of the 1911 with a slighter shorter barrel(4.25″) and an aluminum frame. This combination affords a significant weight reduction of close to 10 ounces. This is significant.

    Ruger 1911, Ruger, SR1911, Combat Commander


    Impressions

    Ruger, Combat Commander, review,

    Trigger: The aluminum trigger is skeletonized and adjustable. No adjustment was needed and it broke very light and crisp, which aids tremendously in the accuracy department

    Ruger, pistol, 45ACP, Combat Commander, SR1911

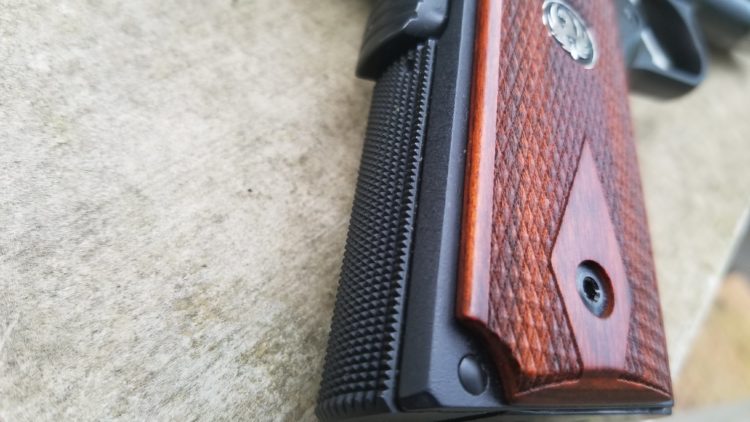
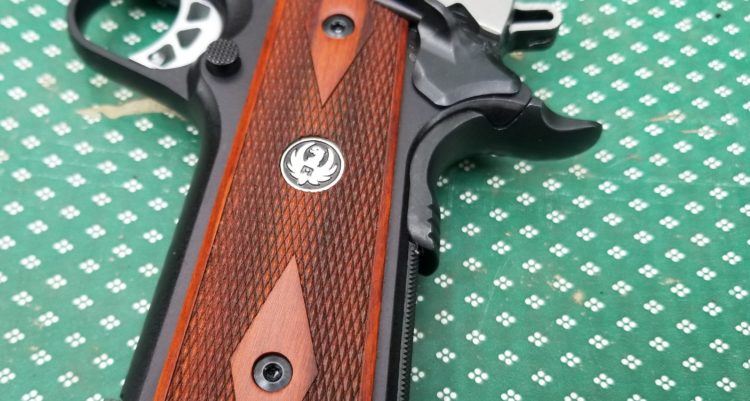
    Mainspring Housing: The mainspring housing is heavily checkered aiding in retention and control of the weapon.

    review, Ruger SR1911, 45ACP Combat Commander

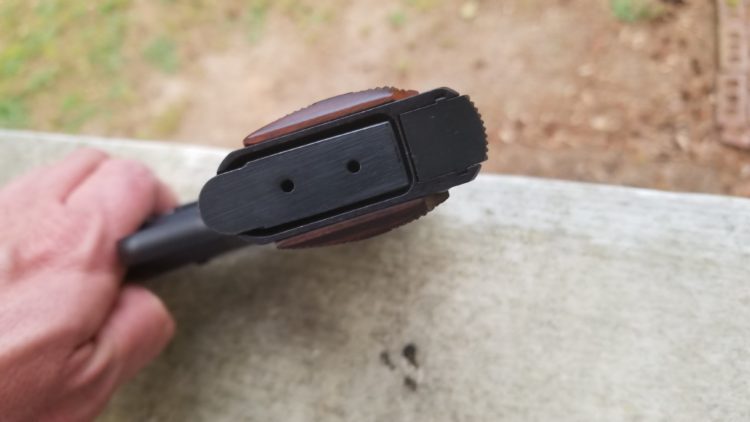
    Magazine Well: The magazine well is beveled providing extra space to facilitate magazine insertion. It works well.

    Ruger SR1911, Ruger, 1911, Combat Commander, 45ACP, review

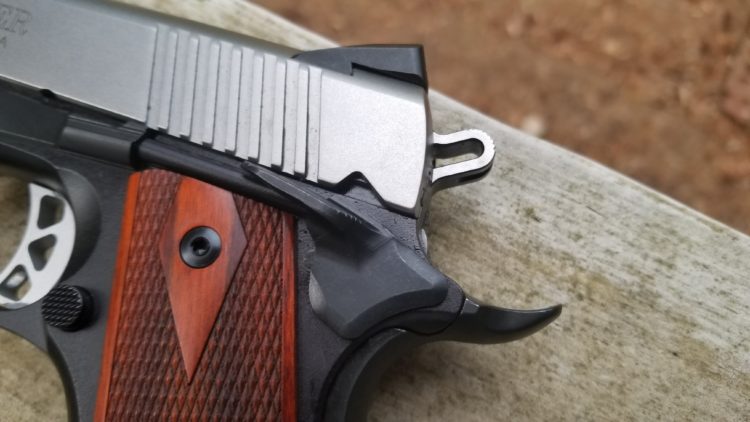
    Thumb Safety/Hammer: The thumb safety is sized perfectly to provide easy manipulation and clicks on and off very positively. No issues. The hammer is skeletonized with excellent cocking serrations.

    Ruger, 1911, 45ACP, SR1911, Combat Commander, review

    Beavertail Safety: The oversized beavertail safety makes for a very comfortable grip and positive function.

    Ruger, 1911, pistol, review, Combat Commander

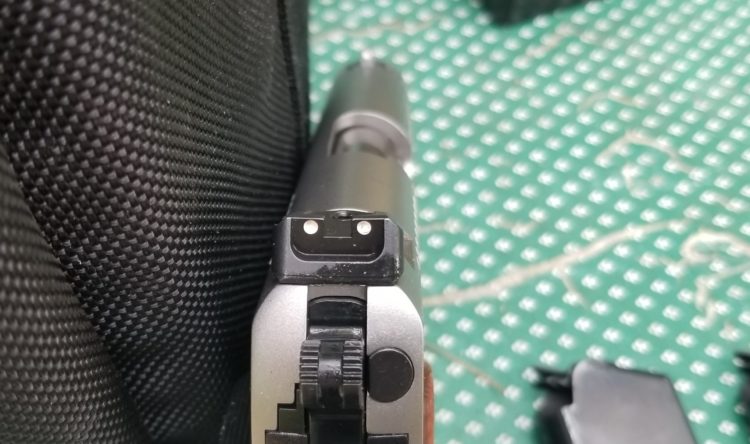
    Sights: The sights are excellent and are the 3-dot variety with smooth edges to reduce snagging.

    Ruger, 1911, SR1911, 45ACP

    Misc: The stainless slide contains deep serrations rearward to assist in cocking. The ejection port is enlarged and flared for positive ejection. The grip feels very nice however I may try some Magpul TSP grip panels or maybe a set of wrap-around Pachmayr’s. The feed ramp is titanium ensuring positive feeding for years to come.


    At the Range

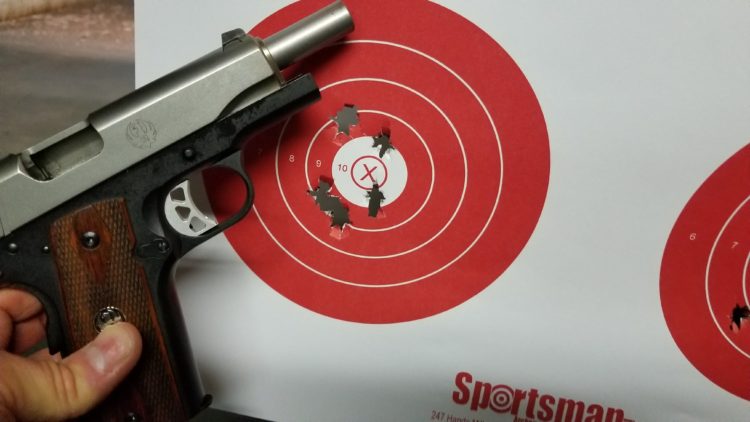
    Let me cut to the chase and just state for the record this thing shoots awesome. It has been 100% reliable, super accurate, and a joy to shoot. I do not proclaim to be the best pistolsmith however its inherent accuracy utilizing tight tolerances and fit combined with a great trigger makes me look better. I have no doubt in a better shooters hands it will perform much better.

    range test, Ruger, SR1911, 1911, 45ACP

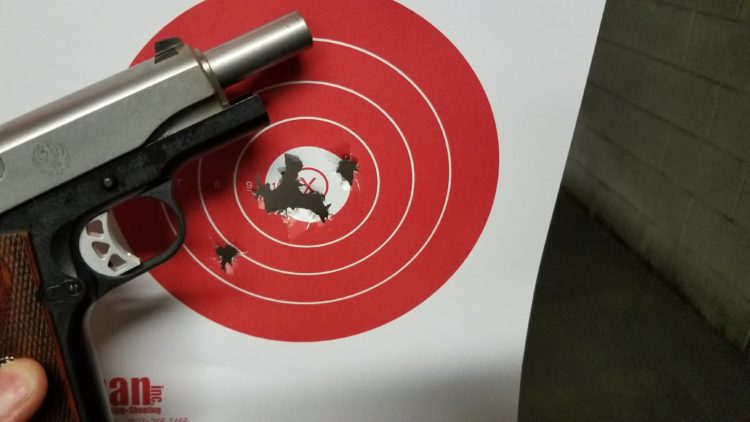
    Above: 7 shot group from 7 yards. Yes – I know 7 shot groups are a bit unusual.

    Ruger Lightweight Commander, review, pistol, 45ACP

    Above: My best 7 shot group from 7 yards. My 7th shot was the flyer.

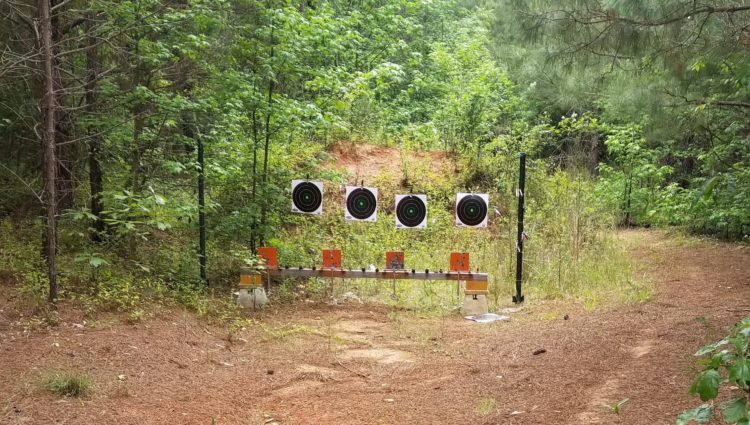
    Above: My brother’s range. At around 30 feet I was easily able to hit the orange metal plates round after round with fairly rapid shooting.


    What ammunition did I shoot? Monarch brass 230-grain ball and an assortment of Federal and Winchester White Box ball. No hollowpoints as of yet.

    Summary: This is an excellent carry pistol and very capable of putting rounds on target accurately and repeatedly. It’s lightweight makes carrying a bit more comfortable than a regular full-sized 1911. Excellent fit and finish make this an attractive self-defense solutions running a street price of around $800.

    line

    Support 1776PatriotUSA in 3 Simple Steps……

    1.  Click on any Amazon link.

    2.  Purchase any item at no additional cost to you.

    3.  Accept my humble “Thank You!”

    Amazon-Logo-schwarz

    Amazon Camping & Hiking

    Amazon Backpacks and Bags

    Amazon Hunting and Fishing

    Amazon Hunting and Survival Knives

    Amazon Tactical and Defense

    Amazon Shooting Supplies

    Amazon Survival & Preparedness Supplies

    line

    Don’t forget to vote for this website over at the Top Prepper Sites. Click HERE to vote.

    vote

      *    *    *    *    *    *    *    *    *    *    *

    Recommended reading for every Patriot? 

    Untitled design (8)

  • Attacks On The 2nd Amendment

    Attacks On The 2nd Amendment


    The meaning and focus of the 2nd Amendment could not be any clearer – “A well-regulated militia being necessary to the security of a free state, the right of the people to keep and bear arms shall not be infringed.”

    The current political environment has politicians and many citizens alike, including President Trump, suggesting that further gun control laws need to be implemented. I often find citizens being ignorant of the facts and have a perspective that is misguided while being frustrated and simply jumping on the anti-gun bandwagon. Politicians merely focus on poll numbers as well as anything to push their anti-gun agenda – and next secured reelection – forward.

    If you’re a visitor here and are reading this you likely already know that the intent of the 2nd Amendment is directly related to holding the government accountable and has nothing to do with hunting or target practice.  The 2nd Amendment was put in place to ensure that the citizens of the United States have the means to overthrow a tyrannical government. Period.

    Those who wish to pass gun control laws are attempting to restrict the ability of citizens to react and hold the government accountable. This is the precise reason the 2nd Amendment was included in the Bill of Rights and the words “shall not be infringed” were so plainly included. Any and all gun control laws that restrict the ability to carry forth the reasoning for the 2nd Amendment are unconstitutional.

    As far as specific firearms the 2nd Amendment may be referring to it is crystal clear. Military-grade firearms. No exceptions.

    Every Patriot that has the ability to purchase a battle rifle should do so as well as stock up on the necessary magazines and ammunition to go along with it. This is a responsibility and a RIGHT, not a privilege.

    No better time than right NOW to stock up.

    Rourke


  • 2018 Gun Control Efforts

    2018 Gun Control Efforts


    Some commonsense talk on gun control legislation that is currently being discussed and put into Congress.

    While I do not believe there is any reason to panic – do the smart thing and continue to stock up because in 2020 should Congress and the Presidency change to the Left gun control will be at the forefront of political action.

    Stack it high and stack it deep!


  • Analytical Survival on Basic Preparedness: Ammunition Storage

    Analytical Survival on Basic Preparedness: Ammunition Storage

    Here is the second part of an ongoing series highlighting videos from Analytical Survival – a fantastic channel on YouTube.

    In this video, suggestions on ammunition storage are presented. As usual – a very logical and methodical method is described with a focus on doing it the right way.

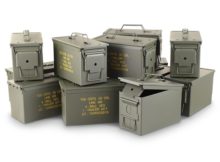
    The metal military ammo can is focal of his ammunition storage suggestions and I have been purchasing these for some time. True military surplus cans can be very expensive so I have gone the route of sourcing aftermarket cans which have worked extremely well. I would suggest staying away from the Blackhawk brand as I have seen some pretty horrible quality control issues.

    Here’s the video:


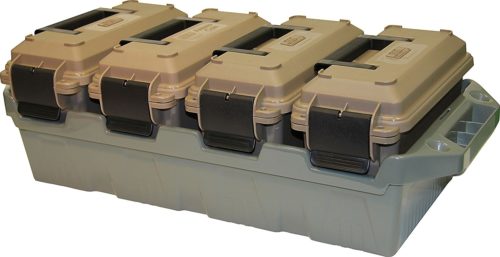
    I’ve been eying this ammo storage system from MTM and plan on grabbing a few:

  • Video: US MARINE –  The Truth About Thumb Over Bore!

    Video: US MARINE – The Truth About Thumb Over Bore!


    There’s not much that will create an argument more than asking “What is the best firing stance and grip?” in a forum of AR shooters. While everyone has an opinion and many feel their’s is the only one that counts I’ll give you my quick answer – “The one that you are comfortable with and allows rounds to be sent down range – accurately.”

    Pretty simple.

    Several years ago I heard of this method competition shooters were using to control recoil and shoot very accurately – called the “C-Clamp”. I tried and hated it. Man – it felt so uncomfortable. I preferred to hold the magazine well however I just could not control recoil well and get multiple rounds on target quickly. I had signed up for a defensive carbine and pistol course from Wolf-Fire Firearms Training and decided to try the C-Clamp again. I used it throughout the class and it really grew on me. Now, this is the primary method I use for shooting the AR.

    The video below gives some perspective on the “thumb over bore” and explains my position on it well. I agree with this guy 100%.


  • How To Paint Your AR-15

    How To Paint Your AR-15

    I’ve made a few attempts to paint AR’s and the results were amateurish at best. While Cerakote and other specialty coatings are very popular(and expensive) – a good-ole paint job can do wonders to enhance your AR.

    The video below shows a great technique. Think I’ll try it on my next build.

    On with the show……

    Looking for full auto conversion plans? Check FullAutoPlans.com. For informational purposes only.

  • Marlin 336W .30-30 Lever Action Rifle Review

    Marlin 336W .30-30 Lever Action Rifle Review


    With the large selection of modern semi-auto “black” rifles such as the AR-15 and AK-47, the lever action is rarely discussed. Although many would argue there is little reason to consider a lever action in .30-30 Winchester with the availability of low-price semi-auto’s – options are a wonderful thing. As stated in the video there are numerous areas around the country where semi-auto, magazine fed weapons are illegal. The lever action in those areas would be a good option. Besides – there are a lot of uses for firearms than just self-defense.

    Growing up it was common to see pickup trucks with rifles mounted in the rear window. More frequently than not at least one of those rifles was a lever action and the other a shotgun. Sometimes called a “truck gun”, the lever action certainly attracts less attention from people than an AK-47.

    While there are pro’s and con’s to the design, function, and ergonomics of the lever-action – it is found in thousands of gun safes all across the United States.

    I wonder how many deer have been harvested with lever actions?

  • Project: AR Pistol Build

    Project: AR Pistol Build


    I’m addicted to building AR’s. I admit it. I’ve been actively searching for a support group to get help. Unfortunately, they all meet at my local gun shop and we end up walking out with lower parts kits, bolt carrier groups, and triggers. It’s not helping.

    For my latest build, I went after another AR pistol(aka legal SBR). I’m not going to go through every pin, spring, and part as it was put together. That’s boring and will take too long. Here are the basics with a summary at the end:

    Lower:  80% non-serialized, completed to 100%


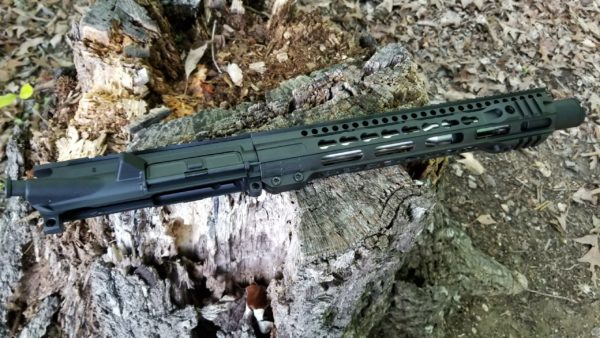
    Upper: Mid State Firearms 10.5″ SS 5.56/.223 Slanted Hybrid Keymod & Flash Can with Phosphate M16/AR15 Bolt Carrier Group


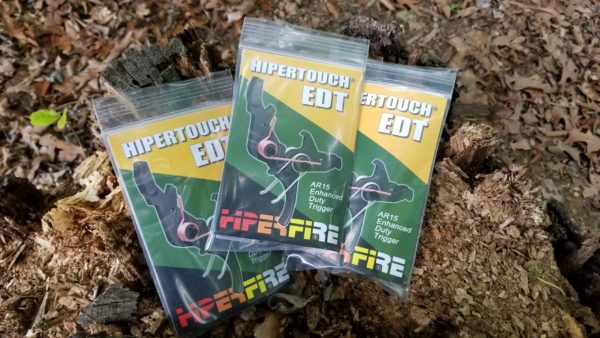
    Trigger Group: HIPERTOUCH EDT


    Charging Handle: Strike Industries AR Charging Handle with Extended Latch

    Lower Parts Kit: Basic Anderson kit


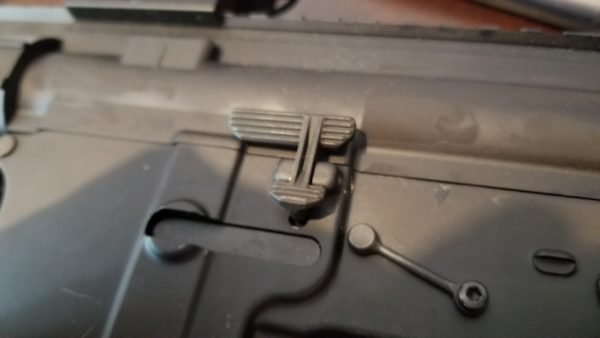
    Bolt Release: Strike Industries Extended Bolt Catch XBC

    Fire Control Pins: KNS MOD-2 Anti-Rotation/Anti-Walk Pin Kit


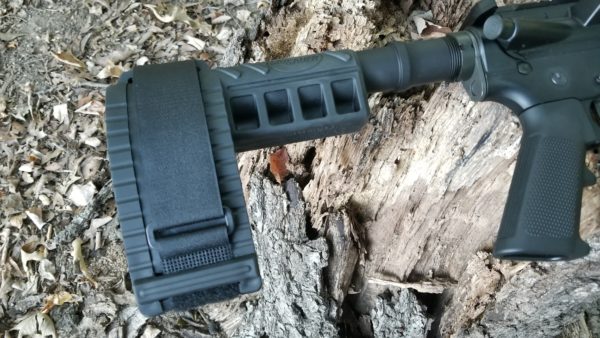
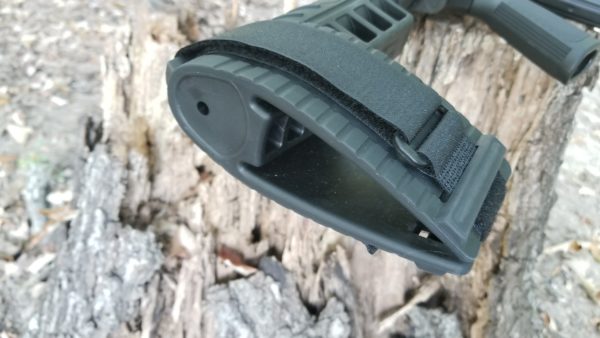
    Stock/Brace: Sig SBX15 Brace with KAK Buffer Tube Kit


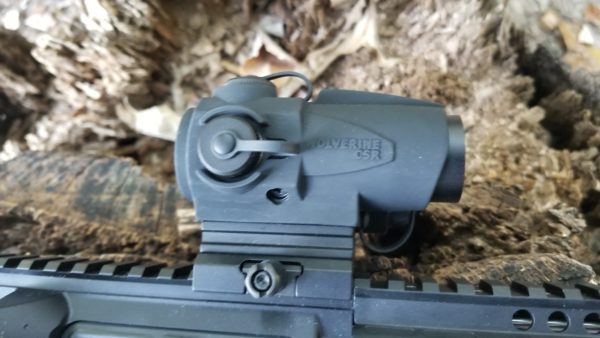
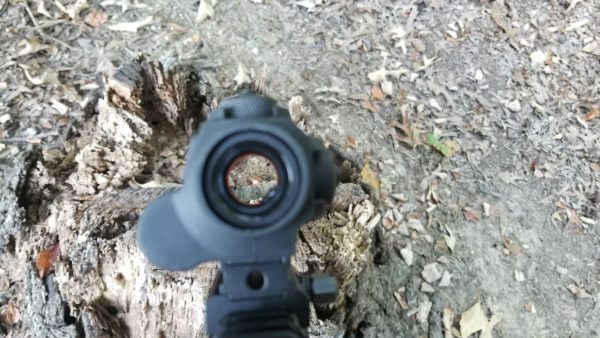
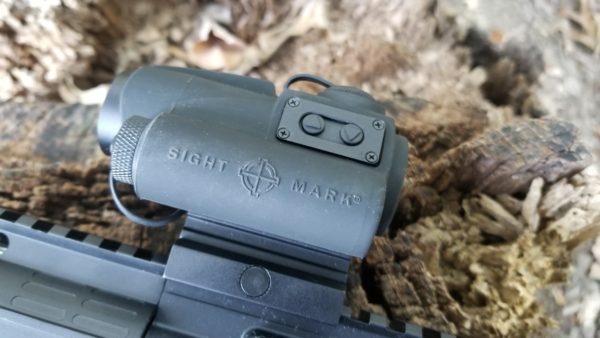
    Optic: Sightmark Wolverine CSR

    SLIDESHOW

    [slideshow_deploy id=’9532′]

    So – why did I build this gun? Did I have some objective? Is it in my arsenal to fill a specific role?

    Come on. I built it because I wanted to!!

    AR pistols are some of the most fun firearms you can own. They can serve numerous functions when it comes to self-defense as well. In fact, my “SHTF Go To” gun is an AR pistol.

    The barrel is 10.5″ in length. For a “pistol” build I prefer 10.5″ as it is MUCH quieter and has MUCH less concussion than a 7.5″ and retains better ballistics as well. The Sig brace was chosen as I wanted to do something different. Previous projects used the Shockwave Blade. I didn’t think I would care for the Sig brace however after putting it to use I love it. So comfortable and makes for a great cheek weld.

    The Phosphate M16 Bolt Carrier Group is a budget bolt however it works. I have one in another gun with many rounds through it and so far so good.

    The Hipertouch EDT trigger is phenomenal. Crisp, short reset, almost no take up at all, and breaks at around 5.5 pounds. For around $90 it is a bargain. I use it in my of my AR’s.

    The Mid State Firearms upper has performed perfectly. The front handguard is extremely comfortable and lends itself to a c-clamp grip. The Sightmark CSR optic so far has done well. Seems very well built and has stayed zeroed through a few hundred rounds. The red dot has a slight touch of flaring but nothing that will be an issue for ranges this gun is likely to see. Controls are perfect. 50,000-hour battery life is nice.

    The flash can helps drive the concussion and noise forward. I struggle to tell a difference but it certainly protects the muzzle.


    Summary:

    As with all AR pistols, this project is small, light, portable, and incredibly handy.


  • Panhandle Rancher: Living with the Model 1911 Caliber .45ACP Pistol [Part 2]

    Panhandle Rancher: Living with the Model 1911 Caliber .45ACP Pistol [Part 2]

    Part 1 can be seen HERE.


    Range safety

    Extend your right hand ahead and out at shoulder level. Move the hand to the right noticing the effort required. With the hand again pointing forward, move the hand to the left, again noticing the effort required. For the same reason that it is easier (but not safer) to rack the pistol slide with thumbs pointing in the opposite direction, the large chest muscles make it easer to move the hand toward and past the centerline of the body. Therein lies a clue for the assistant and/or coach. Smart assistants will generally stand on the strong hand side of the shooter, which is to the right hand side of a right-handed shooter. Smart assistants will also stand slightly behind the shooter. The alert smart assistant is then in a position to control any unexpected pointing or extension of the pistol to the right of the shooter, potentially toward the assistant. This is much harder to do when standing on the weak hand side of the shooter and makes it impossible for the assistant to observe proper drawing and holstering of the pistol.


    Drawing and holstering a loaded and cocked handgun including the 1911 can be fraught with peril. As the pistol handle is gripped, the grip safety is automatically disengaged. A properly holstered pistol will have the slide safety engaged and the properly instructed shooter will have the trigger finger OUTSIDE of the trigger guard until ready to shoot. As the pistol comes on target, the strong hand thumb disengages the slide safety, trigger finger is moved inside the trigger guard, and target engaged. At the conclusion of a course of fire, the slide may be locked back on an empty magazine. The assistant/coach and shooter should both inspect the pistol to ensure the magazine is empty and that there is no round in the chamber at the conclusion of a practice set. At that point the shooter can eject the empty magazine and insert a loaded magazine or gently lower the slide on an empty chamber and holster. In either event, the shooter should automatically engage the slide safety when the slide is closed into battery before starting the holstering process.


    Holstering a loaded pistol has its own dangers. The slide safety should be engaged and trigger finger held outside of the trigger guard at all times during the holstering process. It is easy to fall into a habit of pointing the muzzle excessively toward the rear of the shooter when holstering. This is to be avoided as the muzzle can point toward another person to the rear of the shooter. Range safety officers are always alert for shooters with this bad habit and should position themselves accordingly while offering helpful suggestion to the shooter. Put that trigger finger inside of the trigger guard when drawing or holstering and a loud bang will be heard accompanied by the occasionally ventilated buttocks or side of the leg. The slide safety should always be on and the trigger finger should always remain outside the trigger guard until actually engaging the target!


    Speed in drawing and holstering comes with thousands of rounds of practice and is not a thing to be hastened. Speed and smoothness will happen with practice and patience. Speed should never be rushed.


    Before firing that first round at a target

    Always begin a range session by checking the pistol barrel for obstruction. Pointing the weapon in a safe direction at all times, the magazine is removed, slide safety disengaged, and round ejected. The slide is manually locked back and the shooter peers into the chamber, verifying that no round is present. The shooter also looks through the magazine well in the grip, verifying it is clear of obstruction and debris. At this point the shooter either inserts a cleaning rod from the muzzle and observes the end protruding from the chamber or actually peers down the muzzle. The latter practice is discouraged. Any foreign object or debris lodged in the barrel upon firing a round can cause rupture of the barrel and slide, possibly injuring or killing the shooter and/or bystander and certainly wrecking the pistol. Any foreign debris and or obstructions to the barrel bore must be removed before firing!


    Hang fire and squib powder charges

    In days gone past, bullet propellant (gunpowder) and primers were less reliable. Ball powders were actually remanufactured from decades old WWI naval rifle powder. Shooters would on occasion pull the trigger on a chambered round, the hammer would fall with a mechanical click, and the expected report and recoil not happen immediately. This condition was known as a hang fire or delayed ignition. Whenever the trigger is pulled and bang not heard immediately, always ALWAYS keep the weapon pointed in a safe direction, remove the trigger finger from the trigger and keep it outside of the trigger guard. Expect the weapon to discharge at any time without further action by the shooter.


    Count to sixty using the one thousand, two thousand, method of counting seconds during which time the pistol is always pointed in a safe direction. Remember, the weapon could unexpectedly discharge at any time. If a minute passes with without the round firing, eject the bad round and examine the primer for firing pin indent. If there is no indent, the weapon has probably malfunctioned and must be repaired before attempting to fire again. If the primer is indented, set the round aside until it can be safely discarded by burying or similar. Reload with another round and proceed with the practice session.


    Squib charges are cartridges holding a less than normal propellant charge and in the worst case, no propellant at all. In both cases the shooter will hear more of a pop than a bang upon squeezing the trigger. The firing report will certainly sound different than normal. If the cartridge case was lacking a propellant charge, recoil will be absent and the report quite mild. Either condition is highly dangerous should a subsequent round be fired without removing the bullet that is likely stuck in the barrel. This danger is enhanced in a single action self-loading semi-automatic pistol such as the 1911.


    What has happened is that the primer fired as expected resulting in enough energy to propel the bullet into the forcing cone of the barrel where it likely stuck resulting in an obstructed barrel. Hopefully the recoil was insufficient for proper function of the auto loading capability of the pistol and it failed to eject the fired cartridge case and load another round from the magazine. The absence of a normal report is a clue.


    Keeping the weapon continually pointed in a safe direction, count to 60 using the aforementioned method, remove the magazine and pull the slide fully back ejecting the offending round. Lock the slide open and visually check the chamber to ensure it is empty.


    You performed a barrel check for obstructions before starting to shoot, didn’t you? Take the cleaning rod you used to perform this check and try to insert it down the full length of the barrel. If the tip will not pass beyond the chamber, you have a bullet stuck in the barrel. Had you attempted to fire the weapon again, the barrel would likely have exploded perhaps causing serious injury or death to the shooter and/or bystander. Always wear shooting or ANSI rated protective glasses when shooting or observing shooting.


    A stuck bullet condition is not as melancholy as it seems. Disassemble the weapon for cleaning and with barrel removed from the slide, the stuck bullet should be visible from either end of the barrel. Place the end of the barrel with the shortest distance to the bullet on a soft piece of wood. Insert a length of 3/8” dowel rod into the upper end of the barrel and tap gently with a small hammer. This will eventually force the bullet from the barrel and if it was closest to the chamber end when jammed, upon reaching the chamber, the bullet will drop free. If the bullet was closer to the muzzle end, tap from the chamber end until the bullet nose is even with the muzzle and repeat the tapping process while holding the entire barrel freely in one hand. The bullet will emerge from the muzzle and drop free.


    Clean the barrel and inspect carefully for any bulging or cracking. If none are observed, reassemble the weapon. It is ready for use. If there is any question whatsoever as to the condition of the barrel, the weapon should be examined by a competent gunsmith before shooting again.


    Hang fires are very rare these days but there is always the potential for both newly manufactured ammunition and that a half century old or older. With either a hang fire or squib charge, always keep the muzzle pointed in a safe direction while counting to 60. The possibility of experiencing a squib load increases when shooting reloaded ammunition. Having shot nearly a million rounds, I have never experienced a hang fire and only one squib load that occurred early in my reloading practice at about age 12. Regardless of the weapon being fired, the competent shooter must remain aware of the possibility of both hang fire and squib load.


    Mastering recoil and report induced trigger yank or flinch

    Having learned the fundamentals of safe handling and mechanical operation of the 1911, you proceed to the target range and fire off a few boxes of ammunition. Of course you are wearing ear and eye protection. You shot better at the beginning of the session than at the end with final target hits stringed in vertical orientation. This is good news proving you are human, but bad news demonstrating almost total mastery of a bad and hard to break habit.


    Experienced shooters understand what has happened. Rather than gently squeezing the trigger, in anticipation of the report and recoil, you have begun to yank the trigger. This is an unconscious action and must be overcome before that pistol will be of much use other than as a noisemaker. Choosing to and acting toward, overcoming this bad habit defines a transition between hobby shooter interested in nice toys with an accompanying bang and a developing warrior capable of successfully wielding the 1911 pistol in a combat situation.

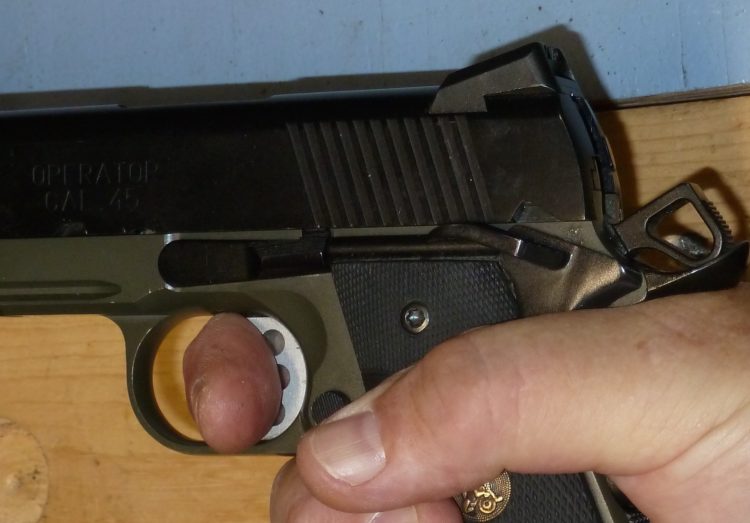
    [Improper finger trigger placement]

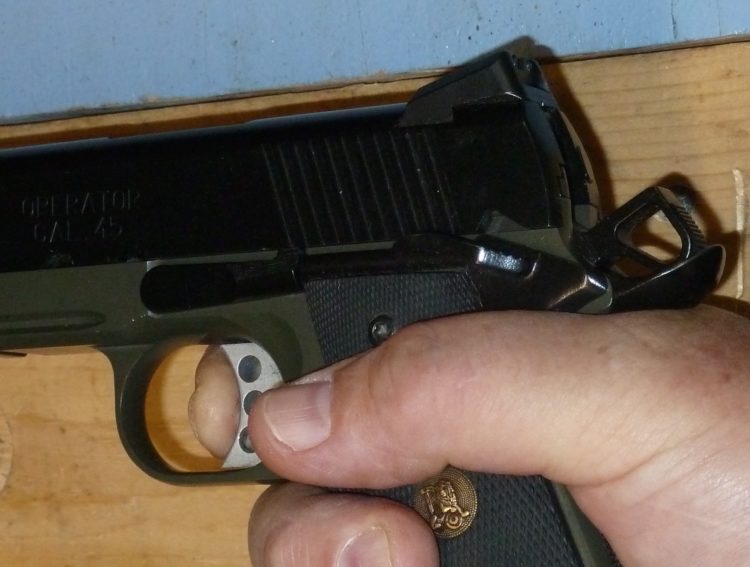
    What produces that vertical string begins with the unconsciously yanked trigger. Abrupt trigger movement starts the muzzle moving downward while the bullet is transiting the barrel. Depending upon how the pistol is held and amount of finger engaging the trigger [see photo above], the vertical stringing may be slanted to the right or left. Proper finger trigger placement allows the trigger to be squeezed straight back along the longitudinal axis of the pistol in a manner causing minimal lateral movement of the pistol [see photo below].

    [proper trigger finger placement]

    Trigger finger placement is an easy fix. That flinch induced trigger yank producing vertical stringing of rounds on target is not so easy and in my experience has only one cure requiring an assistant, optimally a knowledgeable pistol coach. Introducing a second person into the new shooter firearm mix can be fraught with danger for all involved.


    The best cure for that nasty bad habit of trigger yank is achieved by having your assistant or coach either loading or not, one round into a magazine, and releasing the slide chambering a round, or simply easing the slide closed on an empty chamber. If choosing not to chamber a round, the assistant must cleverly slow down the closing of the slide in order to prevent the type of damage described previously to the weapon. That clever assistant will also slow down the slide when chambering a round so that the shooter, even when wearing ear protection, cannot discern by slide sound alone whether a round actually chambered because without care, closing the slide on an empty chamber will sound different than when the weapon strips a round from the magazine and chambers. This difference is even more apparent when the shooter is wearing amplified hearing protection.


    The assistant/coach must wear both eye and ear protection. The use of amplified hearing protection makes communication between assistant and shooter much easier and safer while preserving hearing from loud noise-induced damage.


    This same clever assistant will randomly vary the time in which this closing of the action is accomplished, as the process is easier and faster when not loading a round into the chamber. In either case, the assistant must be certain that the slide is closed in battery and slide safety engaged before passing the pistol to the shooter. The assistant should produce a weapon that is either loaded or empty, in a totally transparent manner that leaves its status completely unknown to the shooter.


    At all times both shooter and assistant must practice safe weapon handling, keeping the trigger finger outside of the trigger guard and slide safety engaged until just before intentionally firing a round.


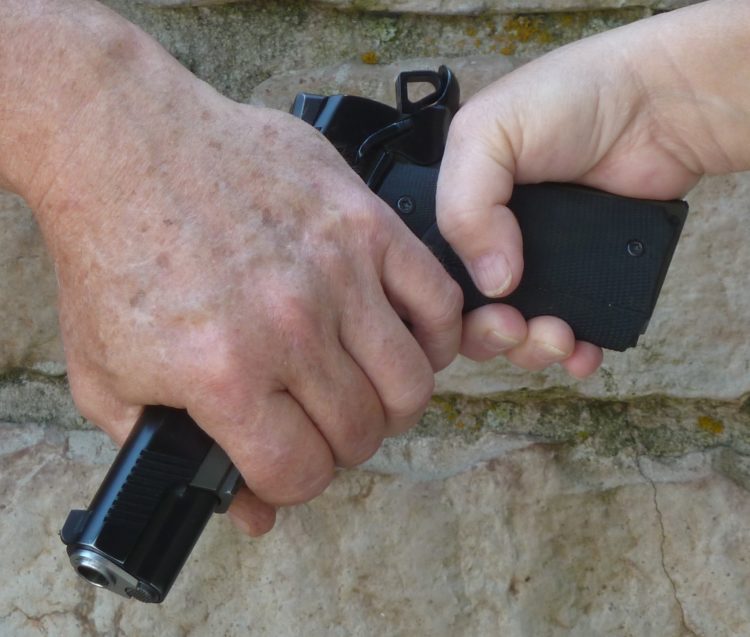
    The method I use when coaching the flinching shooter is to stand on the shooter’s strong hand side and slightly behind. Initially, I load a magazine to capacity, chamber a round, and engage the slide safety. Holding the pistol in my left hand [see photo below, safely passing a loaded pistol], with trigger guard covered by my hand on one side and my fingers on the other (always mindful to keep my fingers outside of the trigger guard) and pistol grip toward the shooter, I announce, “The weapon is cocked and loaded. The slide safety is engaged. At your timing, engage the target, until the weapon is empty.” The pistol is then passed to the shooter.

    [safely passing loaded pistol]

    Knowing the shooter has already mastered at least one bad habit; this exercise starts with a full magazine and is thereafter limited to presenting a weapon with either one chambered round or an empty chamber with emphasis on the latter presenting the shooter with an empty weapon more often than not. The initial full magazine shot at one time conditions the shooter to expect the weapon to fire each time the trigger is pulled. It also may produce vertical shot stringing on target indicative of a yanked trigger. If so, this is pointed out to the shooter before continuing.


    Thereafter the assistant will either chamber a round or not announcing, “The weapon is loaded and slide safety engaged. With one round, engage the target.” The weapon is then passed to the shooter.


    Upon receiving the weapon, the shooter points it toward the target, snicks off the slide safety and inserts the trigger finger into the trigger guard. These two actions should proceed in the same manner every time and only after the pistol is trained on the target.


    If the trigger is yanked on an empty chamber, the muzzle will drop in a manner most noticeable to shooter and assistant. The assistant should be in position to notice trigger finger placement on the trigger, control the weapon if necessary, and to observe the motion of the muzzle when the shooter squeezes the trigger. That yanked trigger with an unloaded weapon is most instructive. The upward recoil of the weapon when fired obscures the initial downward motion of the barrel resulting from a trigger yank making the yank invisible to both shooter and observer. Its best diagnostic is trying to fire an unexpectedly empty chamber, which is of course, the purpose of this exercise.


    When acting as the coach/assistant, I tend not to present a loaded weapon after that first magazine has been fired until the trigger yank is under control and the shooter reconditioned to expect an empty weapon. When a loaded weapon is eventually presented to the shooter, surprisingly the point of impact is almost always exactly where the shooter thought it would be based upon the sight picture at time of trigger release. I then transition back to presenting an empty weapon, occasionally introducing two successive loaded weapons in sequence with the goal being to always keep the shooter from knowing whether the weapon is loaded. At this point, the shooter should expect an empty weapon more often than one loaded.


    Two hours of serious practice in this manner may only burn through only a couple of magazines of ammunition so the exercise is much cheaper than banging away at a can while at the same time, the shooter actually improves in ability to hit a target. In my experience, no amount of shooting where the shooter self-loads the weapon or has knowledge of its loaded/unloaded status will ever overcome the yanked trigger habit. Some things just take two people.


    Having the shooter safely holster the weapon after ‘firing,’ and then un-holster an empty weapon and engage the target can provide variety to the yanked trigger exercise. This permits the shooter to practice safe holster technique.


    The Magazine

    Shooting the 1911 will provide plenty of practice loading magazines. Tactical pistol shooters should always practice loading magazines with heads up, eyes looking around, and not focused on the magazine. Focusing on the activity of loading a magazine ensures a degradation of situational awareness. If the head is consciously kept up with eyes scanning the surroundings, reloading will soon become an automatic activity.


    There are several large capacity magazine carriers for the 1911 that are easily attached to a plate carrier or belt [http://amzn.to/2yvjuTh] and other magazine carriers have a molded rail which is handy for keeping a laser and weapons light such as the Streamlight [http://amzn.to/2iSDHvs] ready for situationally dependant mounting on the pistol rails.


    Comments on cleaning the pistol

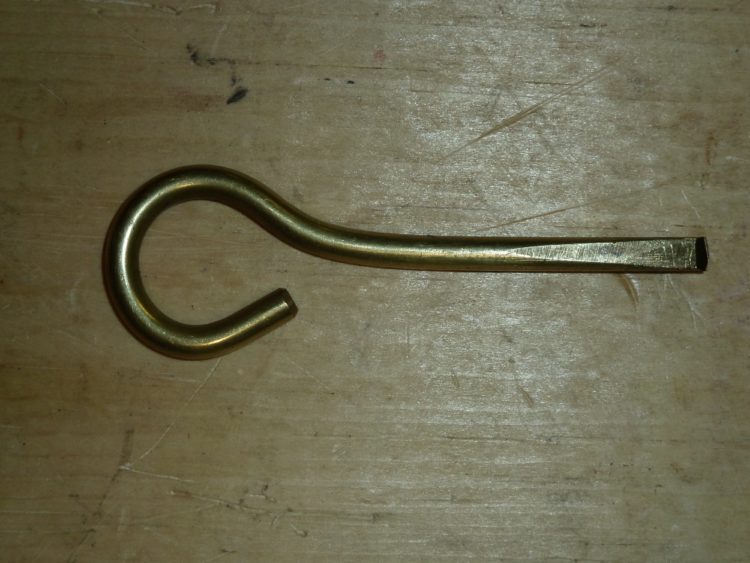
    A most useful aid for cleaning all firearms can be made from a quarter inch diameter brass rod about six to eight inches in length. Form a one-inch diameter finger loop on one end of the rod for ease of handling and file a straight slot screwdriver blade on the other end. This rod makes an excellent fowling scraper to remove burned powder residue from bolt faces, feed ramps, and from frame and slide grooves. Brass is much softer than the hardened metal of the slide and frame and should not damage the gunmetal or finish. An application of Hoppe’s or similar powder residue solvent before scraping is of benefit. As an aside, a hard to remove residue often builds up on the front face of revolver cylinders and in the worse case, impedes rotation of the cylinder. This scraper tool is perfect for removing this residue [see photo below].

    Holsters for the workingman

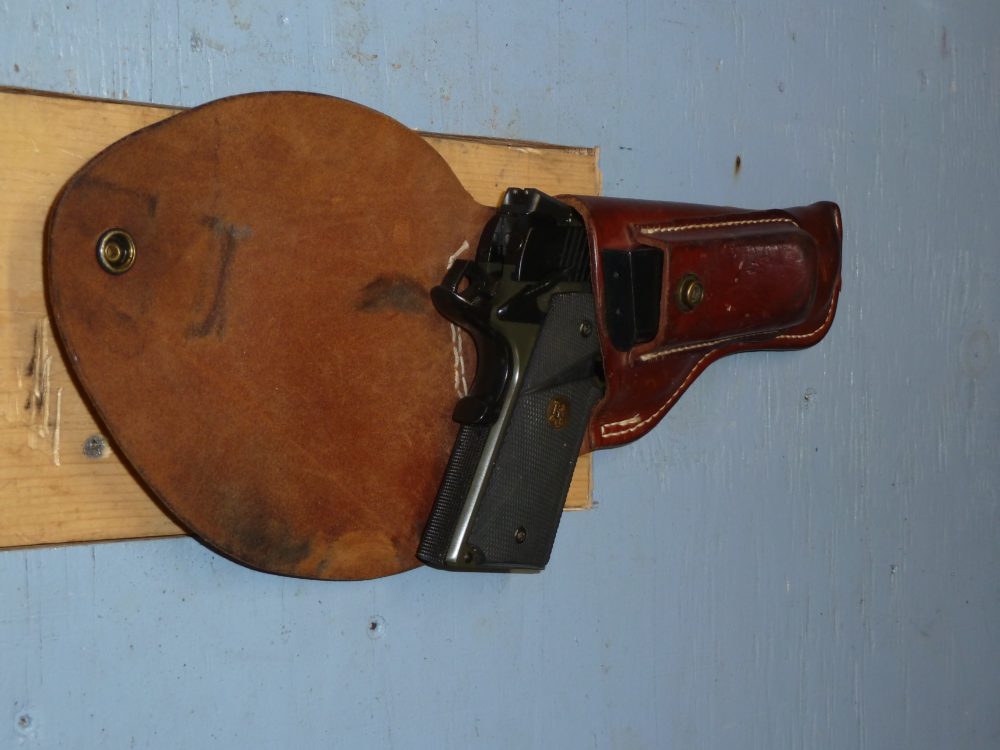
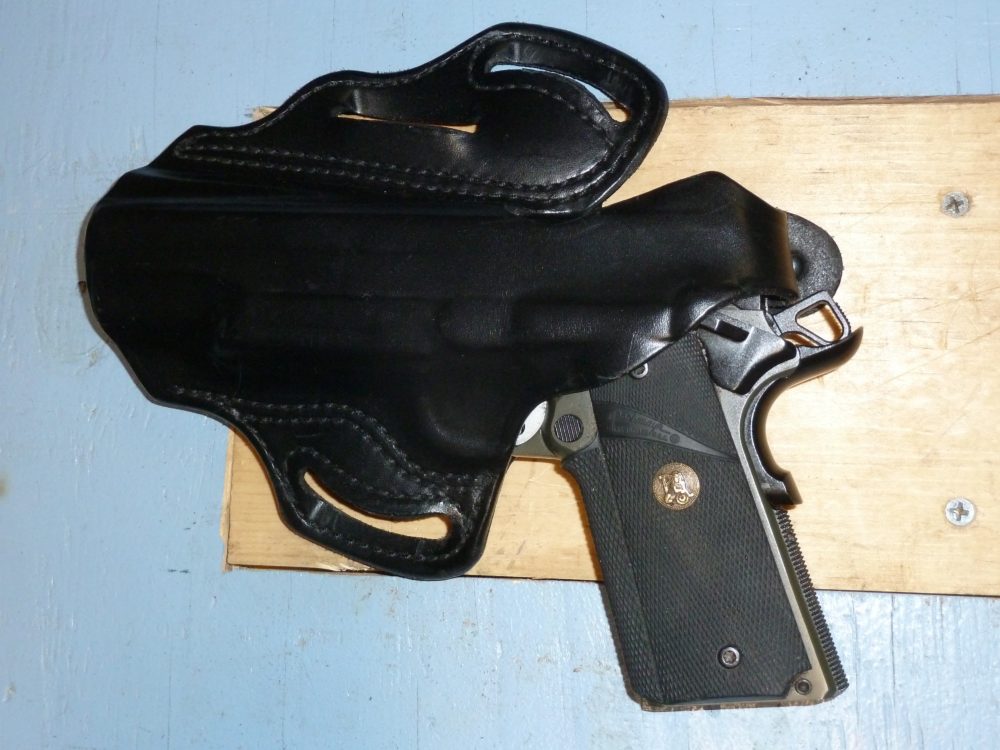
    During much of my career as a suit and tie agent, I carried a .45 in a thumb break, leather holster, worn on a thick leather belt. The thumb break is essential in this type holster to secure the weapon against accidental loss and for retention should someone attempt a weapon grab. Opportunity for the latter is minimized by keeping the weapon hidden unless in use. A slightly forward-slanting holster draws easier than a vertical holster and provides increased difficulty for someone trying to take the weapon from behind. Cross draw holsters beg someone to take your pistol and shoot you with it. Shoulder holsters may have their place in the coat and tie crowd but it is hard to beat the quick drawing capability of a weapon carried in a proper holster worn on the belt.


    Some of the new Kydex and carbon fiber holsters are really excellent but criticized by the slight noise being made when drawing. Leather holsters are almost always quiet. Regardless of carry methodology, weapon retention practice should be a regular part of concealed carry training.


    Any belt worn holster should if its design permits, be worn with the belt passing through the front holster loop, then through the side of the pants belt loop and proceed through the rear holster loop. This anchors the holster to the shooter. The belt buckle always positioned nearest to the holster and by always threading the belt to the holster in this manner, it is more difficult for the holster to freely fall from an opened belt buckle.


    Upon retiring, I became the co-owner/manager of a ranch in West Texas. That experience taught new lessons in pistol packing. One of the first lessons was just how bad it hurt to be bucked from a two-year-old horse – and landing with the holstered pistol between body and earth. This is a special kind of hurt that endures.


    If that ranch produced one species of critter in excess of the most fecund jackrabbit it was the rattlesnake. The wife having been bitten by one of these vile creatures declared war and no one went outside without packing a pistol. I first tried carrying pistols in the same manner as in government service, in a form fitted snap break leather holster. Days outside in the rare rain but all too often wind-driven sand worked their way on the exposed pistol.


    Working outside on the ranch taught an old lesson and I learned anew why the US horse cavalry carried revolvers in a flapped holster. Slow to the draw but protecting the pistol from the weather it is and before long, I had a US Military style flapped holster. It helped somewhat with the wind-born sand and debris of life on a working ranch but I soon gravitated to a full flap holster that covered much of the pistol handgrip.


    Most full flap holsters are sized for a 1911 with uncocked hammer because the military method was to carry the .45 with hammer down on an empty chamber. The flap holster makes drawing slow and having to chamber a round upon drawing even slower. A saddle maker or other competent leather worker should be able to relocate the flap closure mechanism and/or manufacture a longer flap that will cover the cocked hammer. While the flap is being worked on, the belt loop should be relocated as far upward on the holster as practical. This will help the holster hold the weapon closer to the body. Holsters for full-size weapons that have the belt loop near the center of the holster will eventually let the handgrip cant outward from the body which ensures it will snag on almost anything while generating a most Barney Fife look.


    The Bathroom

    Many methods have been used in attempt to secure the belt worn pistol when in the toilet. For those with a holster on a belt loop, the weapon tends to end up on the floor where it might even be accessible to someone in an adjacent stall. Some have placed the pistol on the coat hook on the back of the door hanging by the trigger guard. This is very dangerous as the pistol can be easily jarred from off of the hook and fall on the floor potentially making the pistol accessible to another or in worse case actually discharging. Others have placed their handgun on the back of the toilet on top of the water tank. Both of these methods remove the pistol from the immediate person and the latter makes it easy to forget the handgun when exiting the stall.


    The best place for the holstered pistol when on the toilet is in your underwear between your feet. This keeps it immediately accessible and in a location impossible to forget.


    Final Comments

    Modern 1911 series .45 caliber pistols are sophisticated weapons for self-defense. The presence of multiple safeties, some automatically engaged, can make this pistol safe to carry with the hammer cocked on a loaded chamber but it is imperative the shooter receive hands-on training from a coach familiar with pistols of this design. Whenever possible choose a modern 1911 pistol incorporating the new safety features. The beginning shooter proceeding direct from the gun store with a loaded 1911 series weapon is exposed to a multitude of potential lethal dangers. Competent hands-on training should always be sought before chambering that first round.

    This article advocates keeping the weapon in a loaded, ready to fire condition. When not carried on the person, any weapon in this condition should be secured in a safe or protective container designed for weapons. Children are naturally curious about handguns and may go to unexpected lengths to retrieve a weapon from what was thought to be a perfect hiding place. All weapons when not being carried should be protected from accidental handling by children or curious adult.

  • Panhandle Rancher: Living with the Model 1911 Caliber .45ACP Pistol [Part 1]

    Panhandle Rancher: Living with the Model 1911 Caliber .45ACP Pistol [Part 1]


    Living with the Model 1911 Caliber .45ACP Pistol

    By Panhandle Rancher


    Warning: the following article is intended to provide an overview on the safe handling of the M1911 series caliber .45acp semi-automatic pistol. This article is not a substitute for professional hands on instruction, which the shooter must have before proceeding to load and safely handle this weapon.


    Introduction

    Many consider the Browning designed Colt Model 1911 (named from the year adopted by the US Government) semi-automatic, short recoil pistol, chambered in .45ACP (Automatic Colt Pistol) the finest combat pistol of all time. Others have a love/hate relationship with this venerable weapon but all recognize that it is a war proven man stopper. Over the decades, this fine weapon has been gradually improved and streamlined however the fundamentals of operation and safe handling remain unchanged.
    US Government service in a three-letter organization provided me with some of the very best training in fighting techniques with handguns. Several things happen over the course of years and even decades when shooting from an unending box of ammunition: one becomes smooth and in so doing speedy, accuracy improves dramatically, and one learns what really works and what does not. Speed and smoothness of use come naturally with time and if rushed, all sorts of unintended consequences may follow, perhaps even lethal. Concentrate on always handling weapons in measured, controlled, and smooth manner without jerkiness or overt abrupt motion. Proper practice over a period of time will produce speed of deployment as a byproduct of safe handling and shooting.


    This article will discuss how to make certain a 1911 series pistol is actually safe for the shooter to handle, how to almost completely eliminate the possibility of an accidental discharge (based upon decades of being around pistolarios professional to gang banger), and will offer suggestions on the carry, shooting, and cleaning of this century-old weapon design.


    The reader may have been trained by the military or in a law enforcement academy and consider himself or herself an expert with this weapon. Due to the long period of time it has been in use, a number of bad and even dangerous handling and shooting techniques have been taught. Regardless of your experience level with this or any other handgun, I urge you to read this article in detail. Comments, observations, and suggestions are always welcome and I look forward to hearing from you.


    Shooters in the United States have a wide selection of handguns from which to choose. A choice right for one may be awful for another. The frail or weak may be better off with a revolver as manipulating a pistol slide demands both a measure of strength and dexterity. The small-handed shooter of normal strength may be better off with a revolver or pistol in a smaller caliber, as these weapons tend to have a smaller sized handgrip. For those with normal sized hand and strength, the 1911 has long proven to be a superb combat weapon. With proper training and experience, this pistol is capable of exceedingly fast deployment, great reliability, and awesome accuracy.


    Some nomenclature

    Modern handguns fall into broad categories, break action, revolvers, pistols, and short barreled rifles meeting the legal definition of a pistol. Some handguns have even been manufactured that are bolt action (Remington XP-100, the first I believe in that third category), single shot break action (the Thompson Contender) and others made from shortened double barrel shotguns, another type of break action.


    A double action trigger pull is long and heavy; the single action trigger pull is short and light. Revolvers are generally fed from a revolving cylinder and can be both double action and single action as in the S&W Model 10, or single action only as in the Model 1873 Colt Single Action Army (SAA), also known as the Peacemaker and ‘the gun that won the west.’ This revolver is often chambered in .45 Long Colt.

    Pistols are generally magazine fed, self-loading, and semi-automatic in function.  Pistols may have an external hammer, an internal hammer, or striker. They may be double action only, double action on the first shot and thereafter single action (the SIG P220 for instance), or single action only, such as the Colt 1911 series pistol.


    Both the Model 1873 Colt SAA revolver and Browning-designed Colt Model 1911 semi-automatic pistol (and variants) are known colloquially as ‘Colt .45s,’ These two handgun models are generally chambered for two non-interchangeable .45 caliber cartridges of approximately the same power. This article will focus on the pistol.


    Each of these handgun action types were designed to fit a particular need. Each has distinct advantages and disadvantages. Some handgun designs such as the 1911 may require more training in safe handling than other designs but generally provide a perceived advantage as a combat weapon. The ability to safely carry a modern 1911 with round chambered and hammer cocked coupled with a light single action trigger makes this pistol a very fast first round on target weapon.


    Safe handling of the 1911

    So then, how does one handle the 1911? The glib answer is with care. The shorter any firearm in overall length, the easier it becomes to inadvertently point the muzzle on a partner, bystander, treasured animal, and/or valuable inanimate object. Accordingly, more accidents seem to occur with pistols than with rifle and shotgun.


    The 1911 pistol is a single action only self-loading, magazine fed, semi-automatic characterized by a very light trigger; and although capable of single action firing, revolvers are primarily double action with long and heavy trigger pull. If your finger is on the trigger of a 1911 at the wrong time with safety off, this weapon is ready to discharge, and all too often with sad and sorry result. It is one thing to deliberately and with witting intent, take pistol in hand with the intention of ending a human life. It is quite another to take pistol in hand and accidentally wound self or worse, kill your spouse or child. Each has serious ramifications but the latter, oh the unending and mournful grief.


    The first three rules of safe firearm handling enumerated below are often heard and stand the test of time. The fourth rule is based upon personal experience and if followed along with the preceding three rules, should completely eliminate the possibility of an accidental discharge.


    Rule One: Don’t point the muzzle of a pistol or any other firearm toward anything you don’t intend to shoot.


    Rule Two: Keep the slide safety (sometimes called the manual safety, slide lock safety, or thumb safety) engaged and your trigger finger outside of the trigger guard until ready to shoot.


    When under stress of imminent combat these first two rules are paramount.


    Many 1911 series pistol platforms are not safe with hammer down and round chambered. An unexpected blow on the lowered hammer with a round in chamber may cause a predictable loud noise. Accordingly, the modern 1911 can be safely carried in a holster with round chambered, slide safety engaged, automatic grip safety engaged, and hammer cocked. One has only to draw, unsafe the weapon, and fire. If the pistol is always maintained in a cocked and locked condition with chamber loaded, there is never a doubt of the lethal status of the weapon.


    Always keep that trigger finger outside of the trigger guard and slide safety engaged until ready to fire. Haste coupled with an awkward position, for instance sitting in an automobile or laying prone on the ground, makes it very easy for a finger to accidentally come in contact with the trigger when drawing and holstering. Make absolutely certain the slide safety is engaged and the trigger finger outside of the trigger guard until ready to fire.
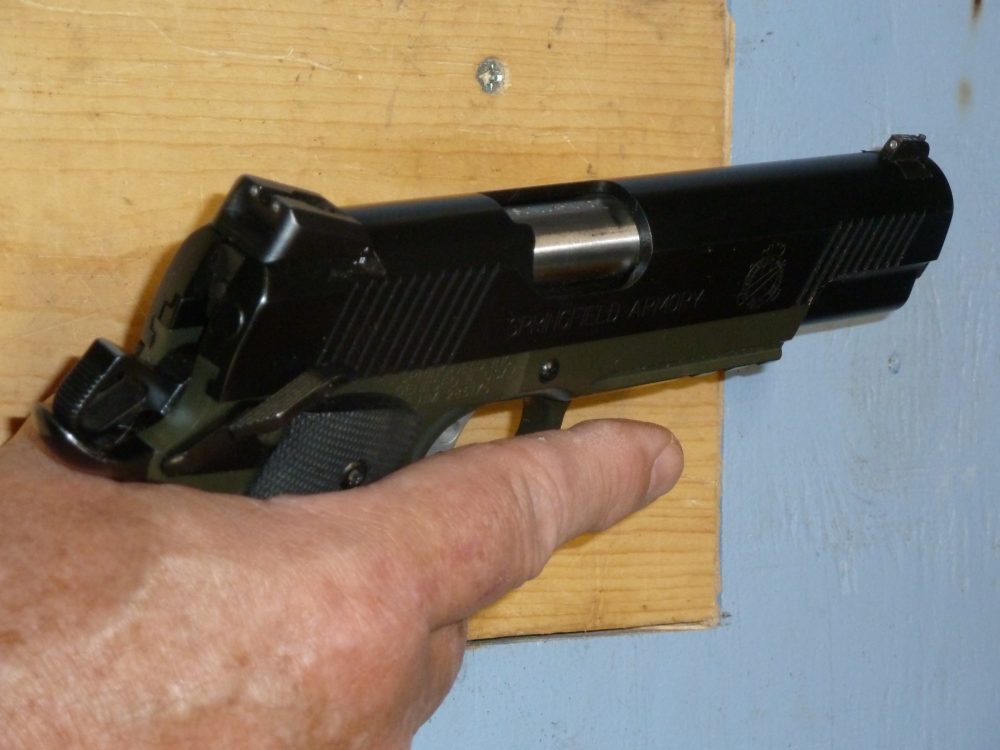
     [finger outside of the trigger guard, slide safety engaged]


    Rule Three: Accidental and unintended discharge commonly happens with the so-called ‘empty’ weapon. Always, always make certain the pistol is empty, magazine removed, and no round chambered, before handling for any purpose other than to intentionally discharge the weapon.


    Rule Four is a partial safeguard when Rule Three is disregarded: After shooting and cleaning the pistol, load the magazine, chamber a round, activate the slide safety, remove the magazine, top with an additional round, reseat the magazine in the pistol gently until it latches, and holster the weapon. DO NOT handle the weapon outside of its holster again until intentionally intending to shoot. Following this and the preceding rules should almost eliminate the possibility of a handling related unintentional discharge. It should go without saying that alcohol and many drugs, over the counter, prescription, and illegal, make handling and shooting of any firearm exceedingly dangerous.


    Rule Four necessarily includes a prohibition against dry firing.  Dry firing, or snapping the hammer on an empty chamber or one with a chambered dry fire cartridge made for this practice, has probably been the cause of more unintended discharges than from any other form of weapon handling. Dry firing has long been advocated as a method of developing trigger and weapon control however when this practice is regularly engaged in, that unexpected loud noise is occasionally heard. This happens with experienced target shooters and trained police. An innocent woman was recently killed by a policeman wielding an ‘empty’ weapon during a police academy practice exercise, http://www.latimes.com/nation/nationnow/la-na-police-academy-exercise-death-20160810-snap-story.html.


    The only really safe way to practice tactics involving pointing a firearm at other people is to have the firing pin removed and a quarter inch in diameter gas relief hole drilled in the barrel just after the chamber!


    How to safely ensure the 1911 is unloaded

    Withdraw the weapon from the holster and ensure the slide safety is engaged. Keep the trigger finger outside the trigger guard and point in a safe direction. Remove the magazine, empty if necessary, and ensure the magazine contains no ammunition. Re-insert the empty magazine into the pistol, and snick off the slide safety. Hold the weapon in your strong hand. If you are right-handed, the thumb on your right hand will lay alongside the left hand side of the pistol handgrip; if left handed the thumb of the left hand will lay alongside the right hand of the pistol handgrip [see photo’s below]. Some pistols have friction ridges toward the muzzle. The same technique is used with the forward ridges however care must be used to ensure no body parts extend beyond the muzzle. Lefties using the forward friction ridges have their right hand palm ready to catch an ejected round.
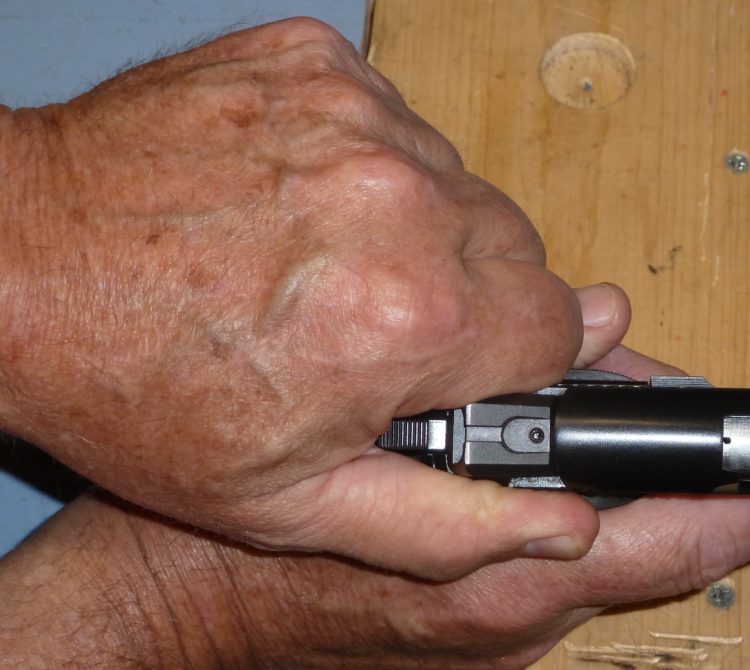
    [right-handed]
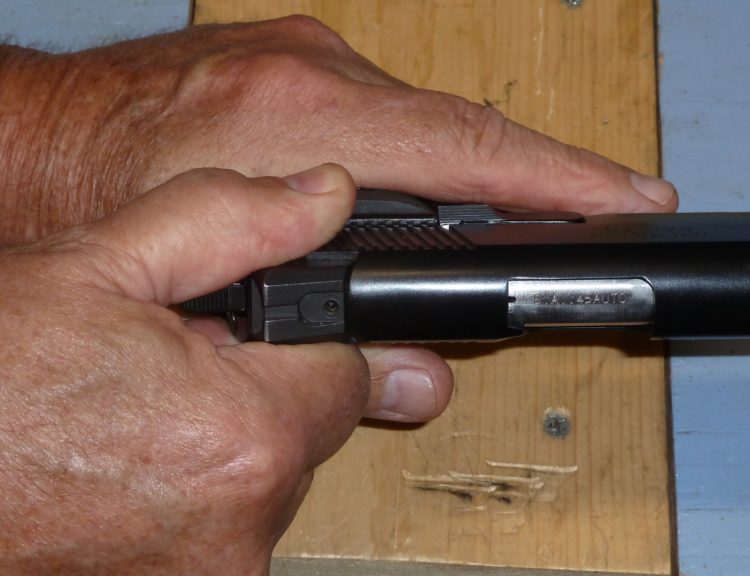
     

    [left-handed]

    Pointing the pistol in a safe direction and with trigger finger remaining outside of the trigger guard, pull the slide to the rear until it locks back. The empty magazine follower should automatically engage the slide hold open locking mechanism. Verify the chamber is clear and remove the magazine. The weapon is now safe for handling and if necessary can be disassembled for cleaning. With a little practice and dexterity, it is possible to engage the slide hold open mechanism with the right hand thumb. This is however not recommended for unloading the pistol because if a loaded magazine is seated and the slide accidentally slips from the fingers of the weak hand, a round will chamber.


    Resist the urge to slam seat the magazine into the grip well. This practice is often dramatically depicted in the movies to emphasize determination and if followed religiously, is guaranteed to eventually deform magazine feed lips, damage the magazine latching notch, and cause damage to the magazine latching mechanism of the pistol. Any of which conditions can cause ammunition feed problems with predictable jams. Gently, press the magazine into the grip well until seated properly. This is always more difficult with a full magazine. A telltale click of the magazine latch will accompany proper magazine seating. Tug on the extending forward edge of the magazine floor plate to ensure the magazine is fully seated and locked into place.
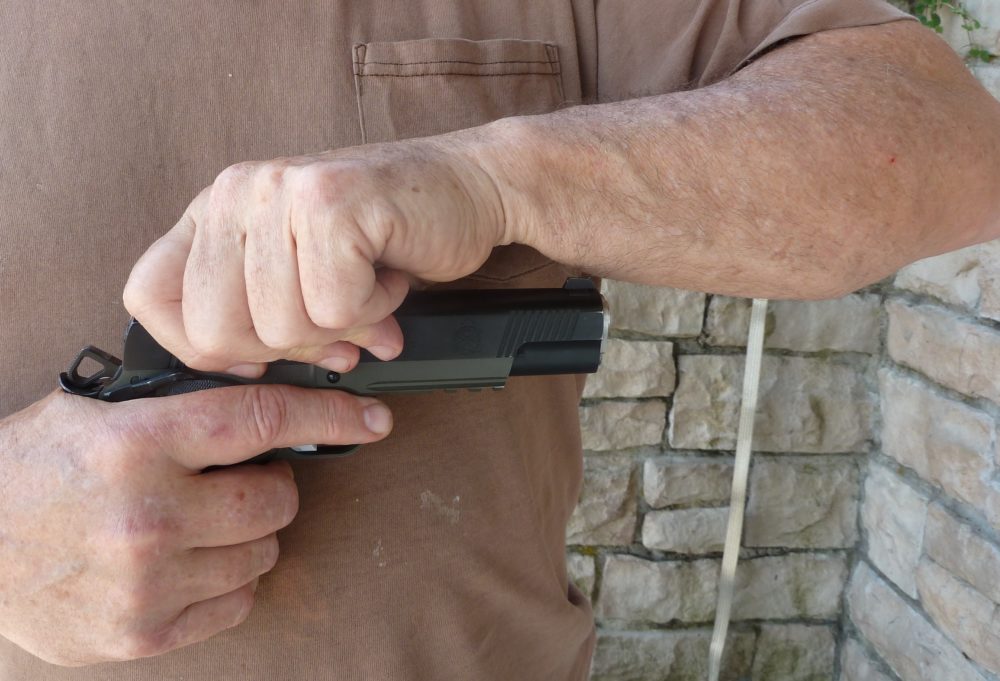
    [showing improper technique]

    A commonly seen loading and unloading technique begins by holding the pistol in the right hand with muzzle pointing to the left. The slide is covered in the top middle with the left hand, gripping the side between the fingers and thumb/palm. This method is dangerous and should never be used. This technique requires the shooter’s left and right thumbs to be on the same side of the slide, pointing in opposite directions. The left hand covering the slide makes it difficult to observe and control muzzle direction. The ‘cover the top of the slide’ technique even when properly executed obstructs the shooter’s view of a large part of the barrel orientation and points the muzzle in a lateral more difficult to observe orientation with muzzle often aligned with the shooter’s left underside forearm.


    Another popular combat taught technique is similar but with the pistol muzzle pointing forward with the rear half of the slide gripped between the fingers and palm of the other hand. When executed properly this method is safe. We, however, have a lifetime of gripping objects using our opposing thumb and fingers and many find the finger/palm approach unrealistic and unnatural.
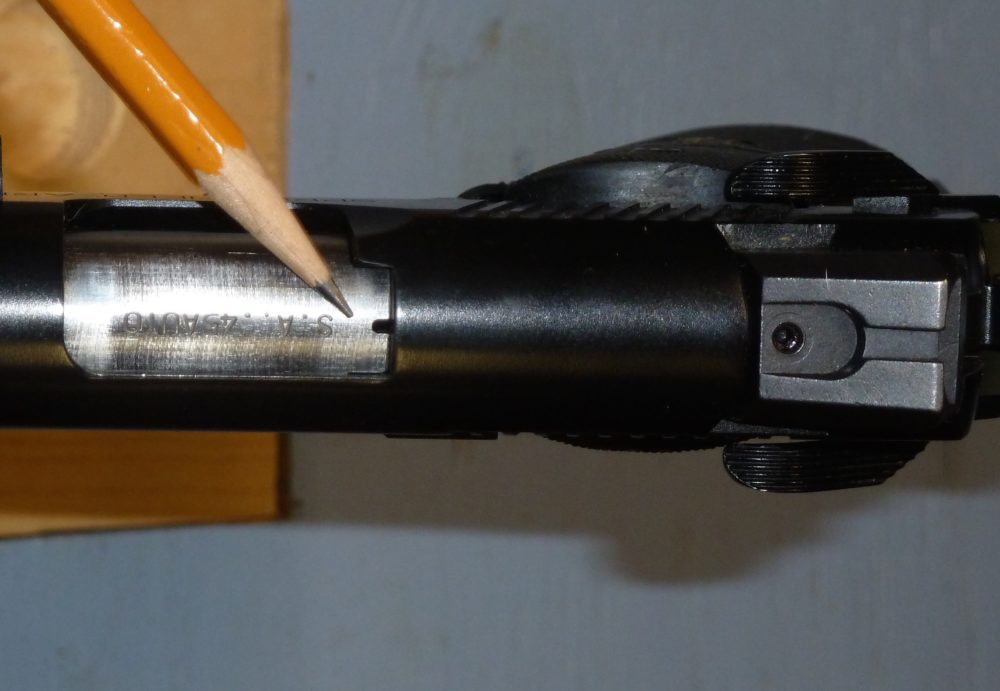
    [witness slot]

    Some 1911s have a loaded chamber indicator or witness slot in the rear of the barrel. The former may be as simple as an extractor protruding from the outside rear barrel area indicating a round is chambered, and the latter, a small slot milled in the breach end of the barrel allowing a portion of the rim of a chambered round to be seen. If your weapon has either type loaded chamber indicator, make checking of the witness device a routine practice, especially when handling an unfamiliar weapon. If your weapon is always maintained in a locked and loaded condition, then there is no need to ever perform a press check or to be uncertain as to whether a round is chambered.


    Why use both thumbs facing toward the muzzle technique of slide manipulation?

    The body is biomechanically more suited to rack the slide while holding the weapon with left and right thumbs pointing in opposite directions on the same side of the slide. This method makes use of opposing large chest muscles. You probably have done this in the past or observed others doing so. This points the weapon laterally across the body, sometimes toward the left forearm and usually to the left hand side for right-handed shooters. This potentially aims the muzzle toward a partner or other bystander and certainly not in the normal direction the eyes are pointed. Racking the slide in this manner to either chamber a round or to remove a round from the chamber absolutely ensures that it is difficult to track where the muzzle is pointing because the barrel and muzzle are hidden below the left hand and forearm.


    Safe slide manipulation as described earlier with thumbs pointing in the same direction but on opposite sides of the pistol ensures the weapon is pointed at least somewhat forward with muzzle oriented in an easily seen and highly controllable direction. This action is more difficult bio-mechanically and thus not commonly seen. Make this both thumbs forward on opposite sides of the pistol technique a habit whenever racking all semi-automatic pistol slides. It will become easier with practice. This method is depicted in the operator’s manual from Springfield Armory http://www.springfield-armory.com/wp-content/uploads/2014/03/1911Manual_5.pdf pages 21, 33, and others. Unfortunately, a dangerous method of uncocking the hammer of older model 1911s is shown on the same page (a safe technique for all 1911 models is described following).


    Strive never to allow the slide to slam shut if not stripping a round from the magazine into the chamber. Doing so can cause damage to frame, slide, and sear, potentially wrecking a good trigger. Chambering a round from the magazine reduces slide forces to design thresholds. An exception to this rule follows.


    How to test the 1911 for proper operation and safety functionality

    The modern 1911 pistol can be safely carried with chamber loaded and hammer cocked only because of multiple redundant safeties and proper training with the pistol. The correct function of these safeties should always be verified after field stripping and cleaning.

    1. Ensure the pistol is unloaded following the previous instructions.


    1. With empty chamber and magazine removed, ease the slide forward into battery. Holding with a normal one-handed grip, point the pistol in a safe direction and squeeze the trigger. The hammer should drop.
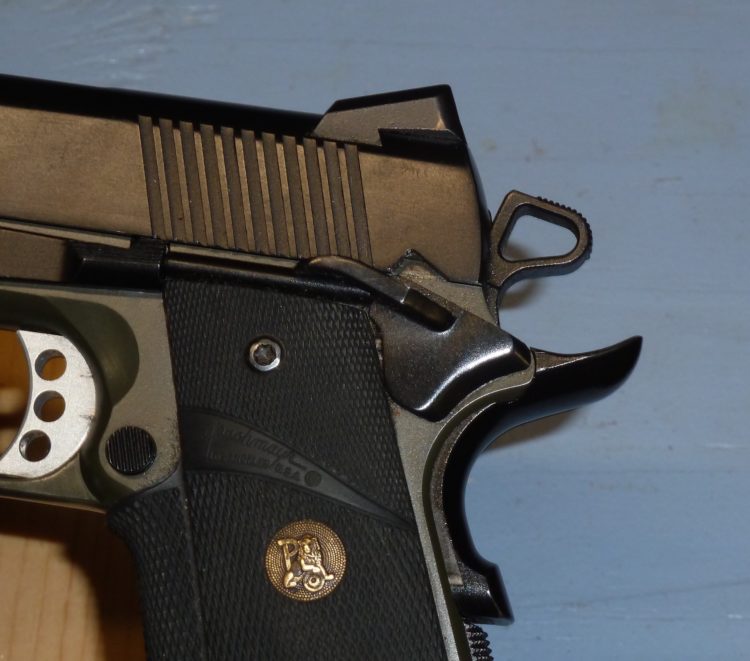
    [hammer in half-cock]

    1. Testing the half-cock sear notch. Point an empty pistol in a safe direction. With the slide forward and hammer down, ease the hammer back toward the cocked position stopping after the first click. With safety off, grip the pistol normally and while still pointing in a safe direction, squeeze the trigger. The hammer should not drop out of the half cock position. The Colt Mark IV Series 80 model introduced after 1983 will drop the hammer but with reduced force supposedly insufficient to actually fire a round. Series 80 1911s also have a firing pin block safety with internal levers and a plunger to positively block the firing pin from moving until the trigger is pressed. The pistols also have a redesigned half cock notch eliminating the possibility of the weapon firing if the hammer is struck. Other modern manufacturers of 1911s have incorporated some or all of these features and if so, should be described in the operator’s manual. The half cock sear notch is designed to catch the hammer should it slip while being lowered and is not intended as a normal carry position.
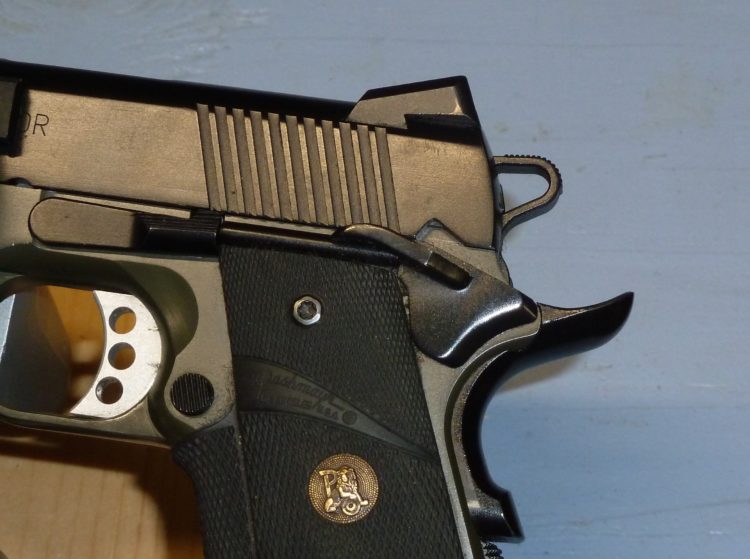
    [Pistol hammer completely lowered]

    There are many older design 1911 pistols in circulation. Treating every 1911 as if it were of the old style avoids a multitude of problems, especially when handling an unfamiliar 1911 series pistol.

    1. Sear reset test. Point an empty pistol in a safe direction and with hammer down, pull and hold the trigger. Pull the slide back and engage the slide hold open mechanism. Press down the slide hold open mechanism permitting the slide to slam into fully closed battery onto an empty chamber. Yes, this might cause damage as pointed out earlier but easing the slide down will not provide enough of a shock to fully test the sear reset mechanism. With the slide now in battery, the hammer should remain in the cocked position created when the slide was pulled back. Release the trigger and pull. The hammer should fall normally. If the hammer fell automatically following the slide closing, a dangerous situation exists that may permit full and likely uncontrollable automatic fire. Do not shoot the pistol until the sear reset is repaired to full functionality.
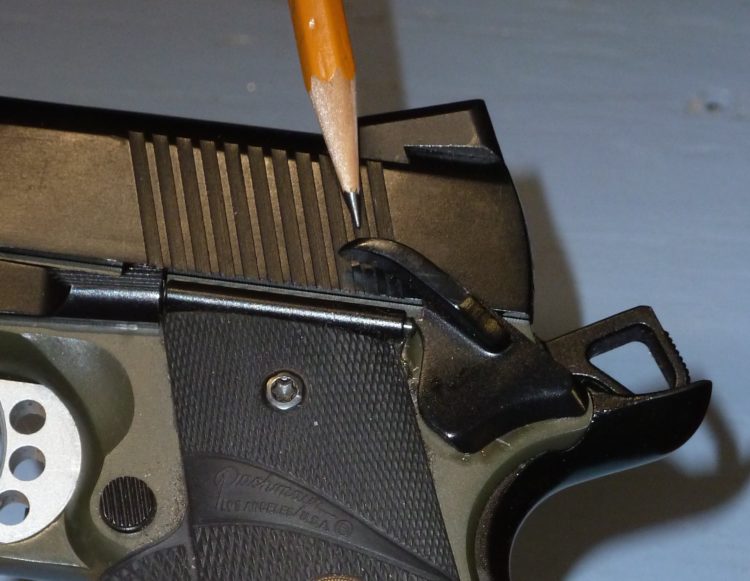
    [slide safety fully engaged]

    1. Slide safety test. Hold the empty weapon in the right hand, slide closed and hammer cocked. Pointing in a safe direction, engage the slide safety. Still holding the weapon as if to fire, squeeze the trigger. It should not move much if at all. The normal shooting handhold automatically disengages the grip safety yet the hammer should not fall due to the action of the slide safety. Other than a very slight movement of the trigger, no perceived movement of any mechanism should occur within the pistol. Grip the rear friction ridges of the slide with the left thumb and outside first finger (thumbs on each hand are pointing in same direction on opposite sides of the pistol). Try to pull back the slide. It should not move. Squeeze the trigger again and release. Disengaging the slide safety should not cause the hammer to drop.
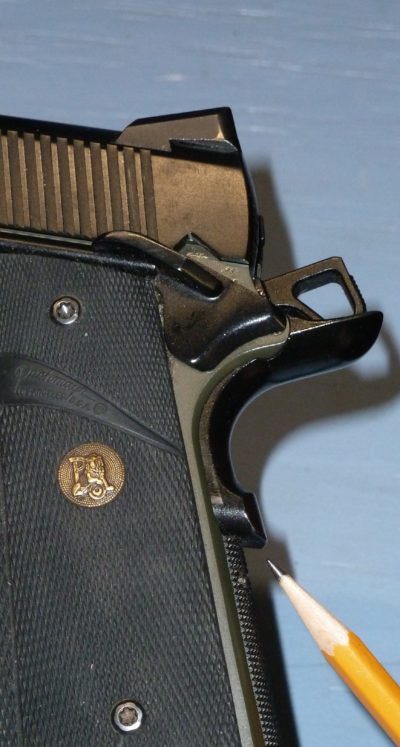
    [grip safety disengaged]
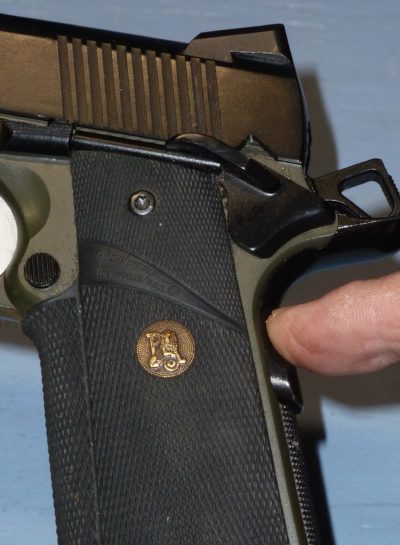
    [grip safety engaged]

    1. Grip safety test. With the empty weapon pointed in a safe direction and slide safety off, cock the hammer. Reposition the holding hand so as to disengage the grip safety [see photo’s above]. Squeeze the trigger. It should either not move or move very little. The hammer should not fall.
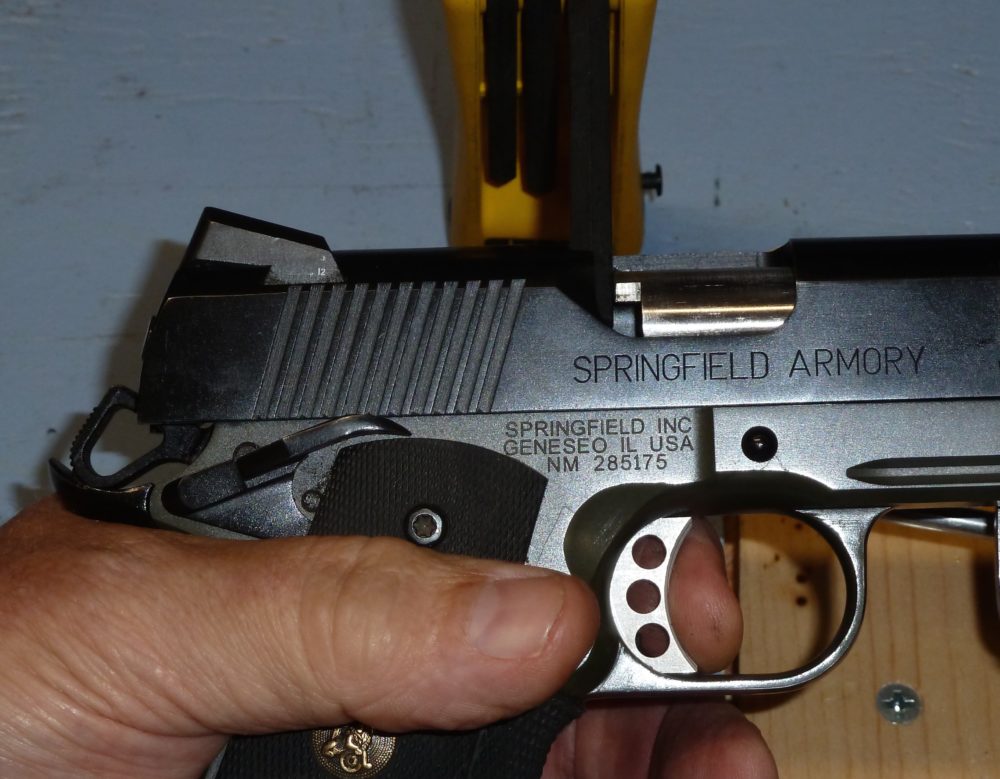
    [safety disconnector test]

    1. Safety disconnector test. With an empty weapon pointed in a safe direction, manipulate the slide ¼” back out of battery. The grip safety should be off (pressed into grip). The slide safety mechanically cannot be engaged. Squeeze the trigger. The hammer should not drop. Ease the slide forward, squeezing the trigger in increments of slide movement. The hammer should not drop until the trigger is pulled with slide closed in battery.
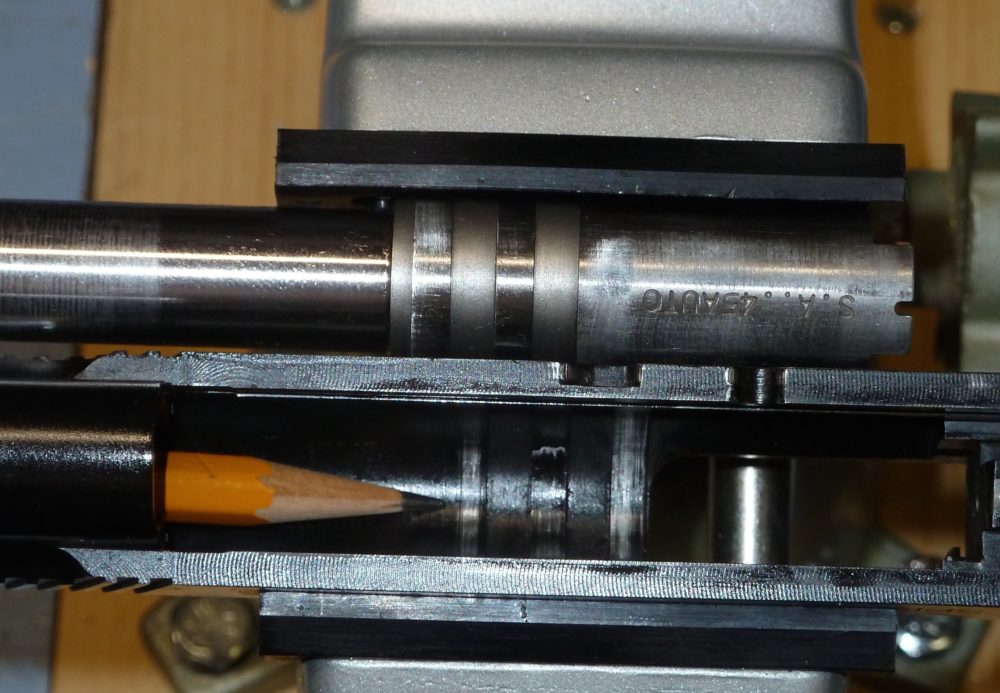
    [interlocking barrel and slide ridges that lock the barrel to the slide]

    1. Barrel lock engagement. With an empty pistol pointed in a safe direction, slide fully forward in battery, with grip and slide safeties disengaged, forcibly push down on the exposed area of the chamber. There should be very little or no movement. Keeping as much of the body as possible out of the path of the barrel, try to push the barrel back into the slide. Again, there should be very little or no movement. A lot of movement in either of these tests indicates that the barrel is not locking up with slide in battery. Firing the weapon in this condition may damage the weapon and shooter.
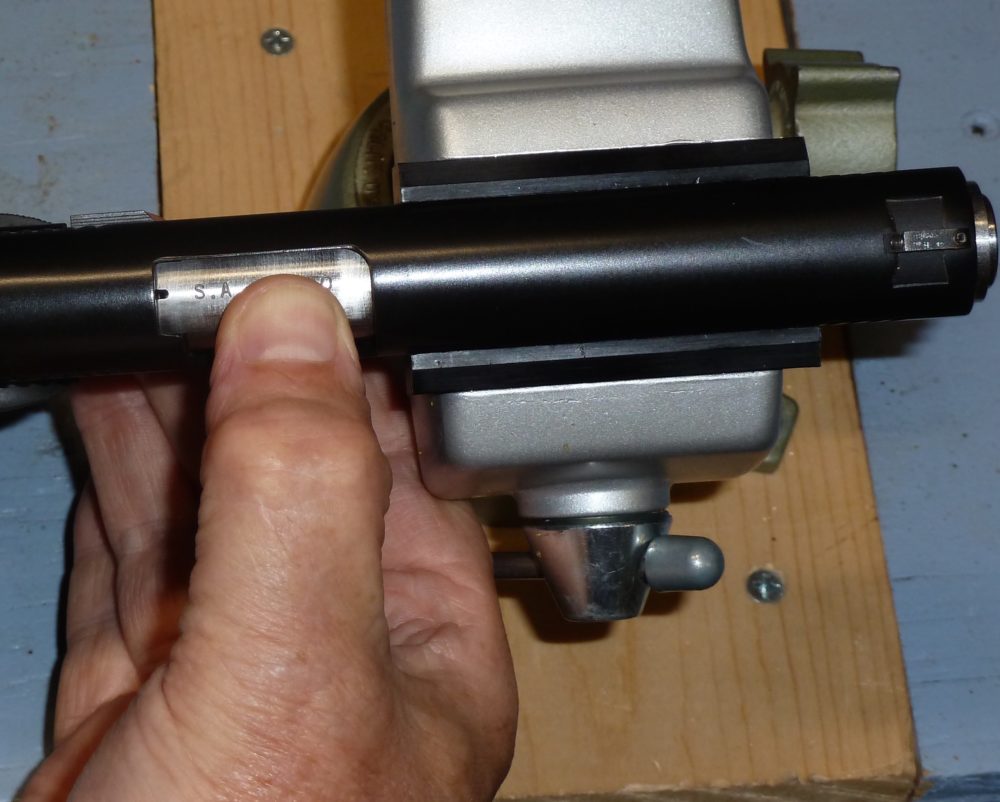
    [barrel locking engagement]

    Faulty barrel locking may cause the action to open before pressure from firing subsides (indicated by the bang when the bullet exits the barrel) and the partially unsupported brass case from the opening action and/or primer may breach from the high pressure. If so, a dangerous release of high-pressure gasses, powder, powder residue, brass fragments, and primer fragments may result. Always wear protective eyeglasses and hearing protection when shooting any firearm.


    1. Slide lock open (or back) on empty magazine test. With an empty chamber, no magazine in the firearm, and slide forward in closed battery, point the pistol in a safe direction. Insert an empty magazine into the slide well. Pull the slide fully to the rear and release. The magazine follower should raise and automatically engage the slide hold open locking mechanism to hold the slide open. There are numerous magazine manufacturers and magazines for the 1911 have been made over many decades resulting in large variations of fit, finish, and wear. As a result, this test should be duplicated with every magazine used with the weapon. Features such as the automatically held open slide on empty speeds the process of reloading.


    1. Magazine release test. Point an empty weapon in a safe direction and insert an empty magazine fully into the magazine well. Holding the pistol in a normal firing position, press the magazine release. The empty magazine should drop from the pistol. Repeat this test with all magazines used with the pistol.


    1. Magazine drop test. Hold a fully loaded magazine at shoulder level and drop on a hard ground level surface. No rounds should eject from the magazine. Repeat for all magazines used with the pistol.


    Should the pistol fail any of the above tests it should be inspected by a competent gunsmith and repaired as needed. Magazines failing Steps 9, 10, and 11 should be replaced with properly functioning magazines.


    How to safely lower the hammer on a 1911 pistol with round chambered

    There is only one way to safely lower the hammer on a loaded 1911 pistol. The hammer is lowered in exactly the same manner that the pistol is properly handled: with care.


    One popular manufacturer shows a method whereby the hammer is gripped between the thumb and first finger, trigger squeezed, and hammer lowered. This practice followed often enough with an early generation 1911 will eventually result in a loud noise accompanied by ringing in the ears. Likewise will lowering the hammer by use of a thumb over the external margin hammer friction ridges. With either technique, the hammer will eventually slip, the half cock safety fail, and that loud noise will occur.


    The competent pistol handler will habitually keep the muzzle pointed in a safe direction with slide safety engaged while keeping the trigger finger outside of the guard until actually ready to shoot. If for some unlikely reason, that unexpected loud noise is heard, no serious damage should result. With this safe handling posture as a starting point, and firm understanding of the following three actions, the hammer can be safely lowered to the full down position.


    The shooter is encouraged to practice and master the following safe method of lowering the hammer with an empty pistol before attempting with a loaded chamber.


    1. Hold the cocked pistol in the right hand. While always pointed in a safe direction, interpose the thumb of the left hand between the slide and hammer[see picture below].
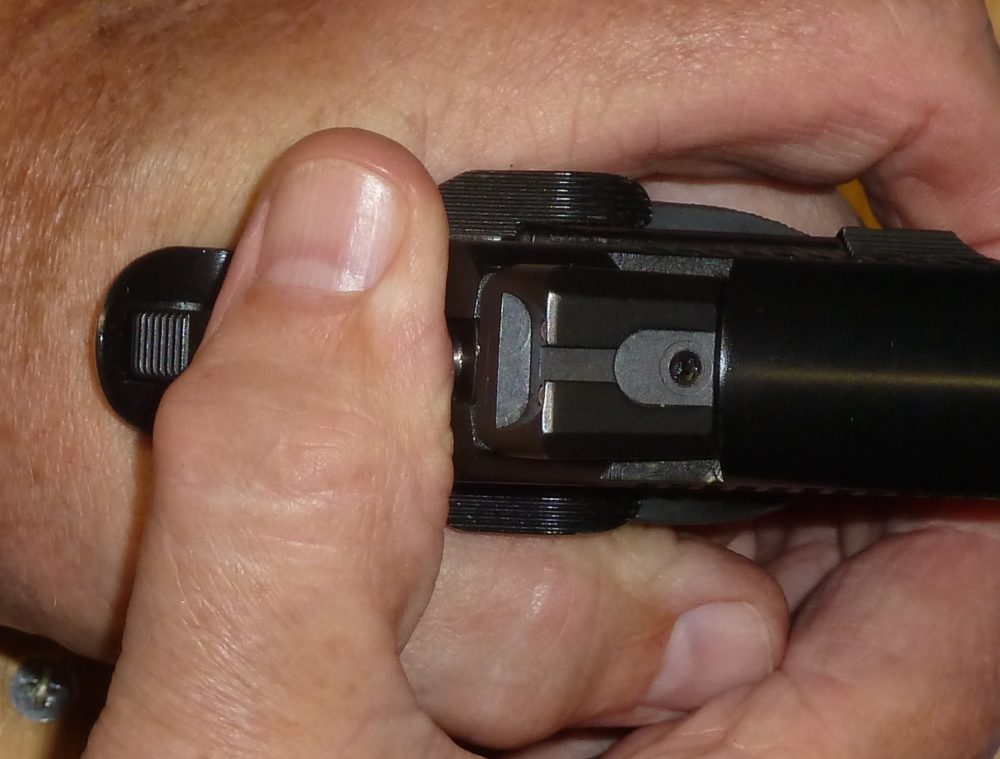
    1. Squeeze the trigger. The hammer should move slightly coming to rest on the outer margin of the left thumb.


    1. Roll the left hand and thumb toward the body while at the same time gradually lifting the thumb from between the hammer and rear of slide. This allows a controlled release and gentle lowering of the hammer.

    With a little practice, the hammer can be safely and quickly lowered on a loaded chamber and without pinching the thumb.


    ……….Check back tomorrow for Part 2.

     

  • Gun’s & Fun: Lightweight AR Build

    Gun’s & Fun: Lightweight AR Build


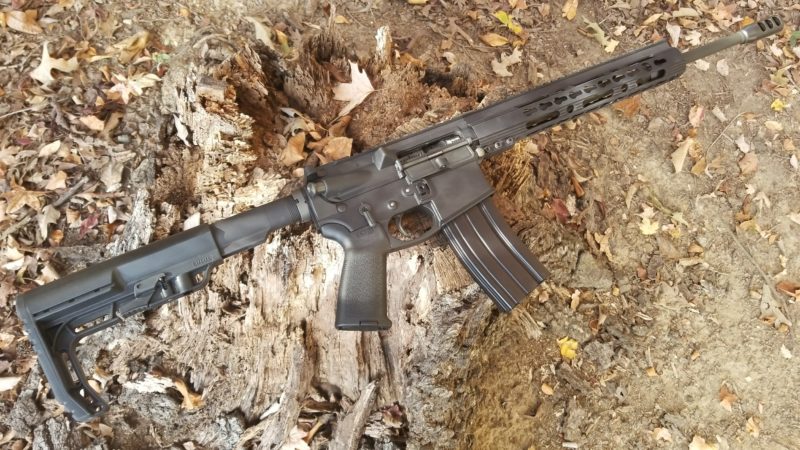
    I’ve slowly built this budget AR-15 over the last few months. It came out pretty much as expected. The first question everyone wants to know is – “How much does it weigh?” I have to give an estimate as I used various methods for weighing it and came out with a few different results. The average of the measurements was 5.8 pounds. This is significantly lighter than many AR’s commercially made – and just a tad lighter than some others. The typical AR with an optic and a couple of rail attachments easily peaks out over 8-9 pounds. So yeah – 5.8 pounds is obviously lighter.
    The picture below shows it in its complete form minus sights. The budget on this gun was under $700 and I barely made it.


    The components were as follows:

    Mid State Firearms custom upper – see MidStateFirearms.com

    MFT AR Minimalist Stock

    Anderson Lower Parts Kit

    Odin Works BCG

    Fostech Lightweight Stripped Lower

    Standard Mil-Spec Buffer Tube and Spring

    Magpul MOE Grip

    Standard Ambi Safety Selector

    Rousch AR Charging Handle

    [slideshow_deploy id=’9145′]

    Summary:

    Moving around with a sub-6 pound AR versus my Stag which runs around 8.5 pounds really highlights the weight difference. While there are ultralight AR’s out there costing upwards of $3,000 – a budget lightweight build is very possible. In fact – this particular build could have easily had a few ounces shaved off. A different flash hider could drop a couple ounces. The all-metal handguard could be replaced with a polymer one. Those that partake in the challenge of building ultra lightweight AR’s go to extremes with exotic metals and extremely expensive componentry.

    Why go lightweight? Ounces equal pounds. Pounds equal fatigue. Weight matters.  Pounds removed from the rifle can equal more pounds of ammunition carried. Options.

    A standard AR is not too heavy. Quality of components, barrel type, comfort, etc. is much more important to me than weight. But – weight is on the list.

    A special thanks go out to MidStateFirearms.com for custom building the upper for me.

    Let the fun begin!!!!!

    Rourke

  • 5 Tips for Improving Your Shooting Accuracy

    5 Tips for Improving Your Shooting Accuracy


    It happens to every shooter, whether you are a novice or an experienced shooter. You get to a point where you miss targets that you know you should hit. Sometimes you may be new to shooting, but you seem to have plateaued in your shooting skills. Or maybe you are just trying to improve your skills to become a better shooter. Either way, it is important you develop discipline and use these tips to improve your accuracy


    Slow Down

    Everyone wants to shoot well and shoot fast. However, speed always comes at the expense of accurate shots. If you are unable to group your shots, the first step you need to take is to slow down. Once you manage to group the shots, you can then start picking up the pace. To learn how to slow down, here is an important tip, which can work great for you.

    Put an aiming point at close range; when using a handgun, this can be at five yards, for a rifle, start at 25 yards. Aim at the center of mass and fire around. Now take as much time as possible to empty the rest of the clip without enlarging the initial bullet hole. That is impossible for any shooter to achieve.

    However, that will help you to focus on the basic of shooting. These are breath control, trigger control, and sight picture. This slow-fire drill helps to reinforce muscle memory needed for accuracy. Now double the distance and repeat the drill. It is also a great way for you to get rid of a flinch.


    Squeeze Trigger Don’t Pull

    The trigger challenge can be divided into two. These are the mental and physical aspect of squeezing the trigger. The mental aspect is the hardwired response in our mind, which causes us to flinch when squeezing the trigger. This will cause the bullet to miss whatever you were targeting. To avoid this, ear protection and practice can really help.

    Since the trigger is below a short barrel in a handgun, unlike a rifle, it is quite easy to tip the barrel if the trigger is pulled too fast. Thus, instead of yanking at it in anticipation of the bang, try to slide it along the same axis as the barrel. This will only work if the index finger is in the right position.

    Avoid having the index finger pressing sideways on it. Press on it straight back like you would when you click on a pen. Besides that, you need to be holding the gun in the correct position. You also need to take your focus away from the loud bang and focus on the trigger. If you do not get used to focusing on the trigger, your mind will always try to pull you away each time. You will find that you flinch quite often when trying to make a shot.


    Alignment is Important

    At the most basic, you need to learn how to align the sights while you focus on the front sight. When you do that, the rear sights should be blurry as should be the target. The front sight should be clear.


    Practice Shooting Drills

    Another important aspect of being good at shooting is practice. After you learn all the skills, you will quickly forge unless you practice often. If you want to become a professional, that will mean hitting the shooting range as often as possible. If possible, look for good drill online, such as this resource that you can use. Try them often until you get that your skills are good.


    Muscle Memory

    The instantaneous and intuitive manipulation of a firearm is one of the most important skills you can learn at a shooting range. However, there is both bad and good muscle memory. For instance, you do not want to pick up bad habits that could affect your accuracy during a competition or when hunting.

    Such situations are stressful, and you want to make the most of them in the least amount of time possible. That will mean you practice as often as possible. Besides that, it will mean you have to use weapons and ammunition that are close to the real thing that you use in hunting or during a competition.

    Additionally, if you use any gear, ensure that it is similar to what you would use in a real-life situation. In short, muscle memory is about learning all the right skills and practicing them as often as possible.


    Alex Briggs is a contributing writer and media specialist for Galco Gunleather. He regularly produces content for a variety of gun and personal safety blogs.


  • Modern Pistols and the Sig P320

    Modern Pistols and the Sig P320


    The US Army adopted the Sig P320 as its new sidearm. Obviously, it will take quite some time to phase out the Beretta’s. Sales for the P320 have skyrocketed.
     
    This means the Sig P320 must be the best combat pistol in existence – right?
     
    No, it doesn’t. While avid 1911 folks and Glock-heads freak at even the mention of another firearm being superior to their own the reality is pistols today are incredible feats of modern engineering. Is one superior over another? No. It is a matter of perspective in MOST cases.
    Sig P320, US Army pistol, test, M17
     
    Little separates their accuracy and reliability. What makes them unique is mostly brand, cosmetics, ergonomics – and then model specific characteristics such as finish, capacity, safety type, action, etc.
     
    Now certainly a Sig P320 is far superior to Hi-Point in almost every way – except price. There are several other examples. When you move on to similar guns such as the P320, Glock 17/19, M&P9, Canik TP9-series, XD9-series, FN’s – and yes – even the Beretta M92 – there is little difference beyond personal preference.
     
    Those that wish to get swept up in “mine is better than yours” fail to see the great thing that lies right in front of them:
     
    You can have whatever you want.
     
    What a great thing the 2nd Amendment is(except in California, New York, and a few other places).
  • Tactics for The American Reformation Part 3: Basic AR-15 Duty Set Up

    Tactics for The American Reformation Part 3: Basic AR-15 Duty Set Up

    Let’s take a look at setting up a Duty AR-15. What is “Duty”? Anything from patrolling property, home defense, as well as battling brigands and other evildoers. Now – a good Duty rifle does not have to cost an arm, legs, and unmentionables. Especially with the current firearm market duty AR’s can be purchased with hundreds rather than thousands of dollars. Factory OEM AR’s from Ruger and Smith & Wesson can be found for under $500 and make good platforms which to have a Duty gun.

    So – what are the main components of a Duty gun?

    • AR-15
    • Sling
    • Optic
    • Flashlight

    With every aspect of all of the components listed above a great amount of personal preference is involved. What works for me may not work for you. What works for Operator A might be terrible for Operator B, etc. Consider a car lot. Every vehicle there will get you where you are going but there is a reason why so many models are manufactured. A general coverage of each component will be reviewed.

    NOTE: Putting together a Duty gun is NOT complicated. This is also not a MISSION SPECIFIC firearm to serve a very certain tole with required abilities.

    AR-15’s:

    Most any AR-15 of at least carbine(16″) length will fill the role. Popular models from Colt, Smith & Wesson, Ruger, Bushmaster, Windham, and others are available and each having models to fit any budget. M4 carbine variants work well and also 20″ full-sized rifles. There is no need for an AR that will shoot sub-MOA groups, or have a special lower with engraving. Reliabilitiy is of upmost concern and importance. The choice is up to the one with the money which to buy.
    Here are a couple examples:

    AR-15, M4, duty gun, prepper, American Reformation, civil war, SHTF, preparedness, tactical

    AR-15, M4, duty gun, prepper, American Reformation, civil war, SHTF, preparedness, tactical

    I’ll note that models in 5.56mm are recommended for a few reasons including ammunition compatibility, ammo cost/weight, and magazine compatibility.

    Sling:

    I run a single-point sling which I like very much. They are simple to use and fast. The main issue with the single point is transitioning from pistol to long gun. When the AR is dropped to switch to a pistol the gun seems to like heading directly to my – gerbils. Not the most comfortable feeling.

    For an overview of sling options –

    A few mentioned slings:

    Haley Strategic D3 Sling

    Magpul MS4 Sling

    BFG Vickers Sling

    Frank Proctor WOTG Sling

    Viking Tactics Sling

    Ferro Concepts Slingster

    QD Mounts


    Optic:

    Iron sights are a basic component as part of any Duty gun. A simple set of Magpul MBUS II folding sights will suffice.  Want something better and made of metal? Buy ’em.

    Most Duty AR’s today will run a red dot optic such as the Bushnell TRS-25, Vortex StrikeFire, etc. Money generally equals quality. EOTech’s and Aimpoints offer increased reliabilities and are worth the extra funds needed for purchase. Red dots provide much faster target acquisition than iron sights and also help those of us with aging eyes. Although there are many red dot optics available it’s important on a Duty gun to have something reliable with a very good track record. Although I am currently testing a Sightmark CSR I would never recommend a company such as Sightmark due to their very questionable reputation.

    weapons light, AR-15, EOTech, sights, Magpul, SHTF, prepper, preparedness

    Magnified optics can prove very beneficial when targeting longer distances. They also can serve to assist in gathering information. For a Duty rifle, the optic should be something in the 1×4 – 1×6 range. The reason for not going to a higher starting magnification is the need to be able to use the optic in CQC. Turning the optic down to 1X will allow near red dot performance.

    AR-15, Patriot rifle, Vortex, Vortex optics,

    Recommended Optics:

    Magpul MBUS Gen II Flip Up Sights

    Bushnell TRS-25

    Vortex StrikeFire II

    Vortex Sparc II

    HOLOSUN Micro Red Dot

    EOTech 552

    Aimpoint Pro

    Trijicon MRO Red Dot

    Vortex Crossfire II 1-4X Scope

    Primary Arms 1-8X Scope


    Flashlight:

    Illumination is an important component of a Duty rifle. The weapons platform may be used to illuminate a threat at night or possibly an intruder inside a building.  While there is a lot of controversy as to just how bright weapon mounted flashlights should be in the end that is up to the shooter – and your wallet. Understand that an 800 lumen light reflecting off white drywall can interrupt the ability for the holder of the gun to see – not just the “bad guy”. Companies such as SureFire and Streamlight have great reputations for making reliable weapon lights.

    weapons light, duty gun, Polytach, AR-15, light,

    Exactly how the light is mounted and run is up to the shooter.

    M-Loc, light mount, weapons light, SureFire, Streamlight, AR-15


    Recommended Flashlights:

    Streamlight Polytac

    Streamlight TLR-1

    SureFire Mini Scout

    Streamlight ProTac


    Summary:

    The Duty Rifle is an integral component to preparing for the American Reformation.  It is reliable, versatile, and accurate. Only with training can it be put to use to take advantage of its full capabilities.

  • Trajectory of the .223/5.56 Round in a Carbine

    Trajectory of the .223/5.56 Round in a Carbine


    With the popularity of the AR platform and the .223/5.56 round I thought it would be a good idea to review the trajectory of the round and common sighting ranges. Being a high velocity round the trajectory is relatively flat within a few hundred yards – past 400 the drop-off is significant.

    eotech

    There are several philosophies on sighting in the AR and what range in best. Here are a few examples:

    50 Yard Zero – Sighting in the AR to be on the money at 50 yards is extremely popular and typically what I do. Why? Because at 100 yards I will be hitting about 1.5″ inches high and at 200-225 I will be back on the money. This provides excellent accuracy from 0 out to past 250 yards with little if any compensation especially if we are talking about shooting man sized targets.

    This is by far the most popular method used for sighting in an AR.


    100 Yard Zero – Not a bad option at all. With a zero of 100 yards the .223/5.56 round will impact approx 3/4″ low at 50 yards and around 2.25″ low at 200 yards.


    25 Yard Zero – I don’t care at all for sighting in at 25 yards. When zeroed at 25 yards the round will also be zeroed at 300 yards. This strategy does not provide much of an advantage unless longer range shooting is planned. The problem is between 25 and 300 yards where either the rear sight has to be adjusted for elevation while shooting or english used.

    All these numbers are relative and depend on specific barrel lengths, loads, and barrel rifling.

    I recommend the 50 yard zero.

    JR


      *     *     *     *     *     *     *     *     *     *     *     *     *

    Supplies for the Zombie Apocalypse..... (4)

    Here are a few recommended preparedness supplies and items:

       *     *     *     *     *     *     *     *     *     *     *     *     *

    Check out the Emergency Essentials Monthly Sale!

    Emergency Essentials has been a leader in the preparedness industry for well over 20 years. Monthly featured sales offer huge discounts on many preparedness products including freeze dried foods.

    728x90feb20161

    Emergency Essentials carries Mountain House as well as their own house-brand of freeze dried foods. Great prices and inexpensive shipping provides a great way to increase food stores and save money in the process.

    Visit the Emergency Essentials website for more information.

     *     *     *     *     *     *     *     *     *     *     *     *     *

    Want to help support what we do here at 1776PatriotUSA.com? Follow any link from this website to Amazon, make a purchase, and we receive a small commision at no additional cost to you. Zero. Nada.

    Amazon-Logo-schwarz

    Amazon has a little known feature called “Best Selling” lists. Basically they rank the most popular products purchased within certain categories.  Here are a few Best Selling lists you might be interested in…..

    Best Selling Camping & Hiking Products

    Best Selling Hunting & Fishing

    Best Selling Flashlights & Lanterns

    Best Selling Tents & Shelters

    Best Selling Tactical & Personal Defense

    Thank you!!

  • Chris Costa on Why We Train

    Chris Costa on Why We Train


    Prior to founding Costa Ludus in 2011, Chris Costa spent 4 years as the President of Magpul Dynamics. Before founding Magpul Dynamics, Costa spent 7 years in the private sector at Applied Marine Technologies Inc. (AMTI) on assignment with the U.S. Department of Homeland Security’s Risk Management Division (RMD).

    Also known as “The Beard” – Costa tells it like it is and provides logic and common sense to his opinions.

    In the following video, he and those he trains provides thoughts on “Why We Train.”

    I train for multiple reasons and it isn’t always as noble as “To protect my family”.  I enjoy it. I love getting out from the narrow walls of a typical shooting lane and moving – running – from cover to cover engaging targets. Increasing a wide range of abilities and skills to a level superior to I had before. It’s rewarding. It’s fun.

    The end result of all that fun is the ability to protect me, my family – and my country.

    Rourke

  • The “Patriot” Rifle AR Build

    The “Patriot” Rifle AR Build


    My latest AR is the result of the “Katrina” rifle concept. Katrina rifle you ask? The term came about after Hurricane Katrina devasted the Gulf and left many residents in a state of WROL(Without Rule of Law). Widespread looting, lawlessness, and general civil unrest provide a very dangerous environment.  Add to this the absence of law enforcement the need for a Katrina rifle is evident. This single weapon – like in New Orleans – may be used at 25 yards or 250 yards. Yeah – there are a lot of AR’s and other firearms that will fit the bill. A firearm similar to this should be part of every preparedness system. This is merely one example.

    Components List:

    80% AR low from 80-Lower.com ($60)

    Anderson Lower Parts Kit – LINK ($50)

    Magpul AR grip ($20)

    Strike Industries Charging Handle w/Extended Latch ($40)

    PSA Full Auto Bolt Premium Carrier Group – LINK ($70 – SALE)

    Standard M4 Stock/Buffer Tube

    16″ Mid State Firearms Specter .223 Wylde AR Upper w/12″ Gen3 Slim Rail – LINK ($279)

    Vortex Crossfire II 1-4X24mm Rifle Scope w/Mount – LINK ($210)

    TruGlo Micro Laser – LINK ($70)

    2-Point Sling – still yet to purchase


    Lower: The 80% lower started this project. No particular reason I used an 80% other than it was sitting on my shelf. The fact that there is zero traceable paperwork connected to it is just the icing on the cake. While many may fear to attempt an 80% build jigs and instructions provide an avenue for the manufacture of the lower with minimal equipment.

    Mine came from 80-Lower.com and the finish is fantastic and I have zero fit/function issues.


    Upper: The 16″ Mid State Firearms Specter .223 Wylde upper is amazing. The slim configuration along with available picaninny attachment rails offer tremendous comfort as well as real estate for attachment of accessories. This is my second Mid State Firearms upper and couldn’t be happier. Free float barrel and a 1:8″ twist rate provide a high level of accuracy with a variety of bullet weights. I shoot 55-grain almost always with 62-grain making an appearance periodically. Accuracy? I readily admit that I am not the best shot and every gun I own will shoot better than me. So far 3 shot groups at 100 yards under 2″ is repeatable with XM193 ammunition. I plan to work with some premium rounds and reduce to 1″ or under.


    Charging Handle: Historically a standard AR charging handle has always worked fine for me. With this project, I decided to look and see what was available for a little more than the cost of a standard one. Once I saw the Strike Industries I bit. While a normal charging handle still works fine on some of my other guns the Strike Industries definitely provides a secure grip especially in lieu of the Vortex optic. A standard handle would be more difficult to reach. For an extra $10 or so it was so worth it.


    Magpul Grip: I have several AR’s with Magpul MOE grip or a slight variant of it. It simply works and provides not only comfort but a more secure grip than an A2 grip.


    Stock: I had a standard M4 stock with buffer tube sitting on the shelf so I used it. Nothing special and it works just fine. I have considered moving on to the Magpul but so far just cannot justify the cost.


    Flash Hider: The Mid State upper came with the Specter Flash Hider. I had wanted a flash hider that was more “tactical” than a standard A2 cage. Hopefully “poking” someone is not in the future for the Patriot but if the need arises I like the sharper edges of the Specter. Night time shooting? It’s on par with a standard A2 flash hider which by the way is way better than many aftermarket models costing a lot more.


    Optic: The Vortex Crossfire II 1-4X24mm Rifle Scope w/Mount is precisely the kind of optic I was looking for. When set at 1X it is very close to true 1X allowing operation with both eyes open similar to a red dot. For CQC this is great. For longer ranges the power can be twisted up to 4X bringing things closer for more precise shooting. The Vortex is very clear.


    Summary:

    I’m in the process of selecting a sling. I want something simple and a 2-point rather than my normal single point.  I mounted a TruGlo Micro Laser for use at night as being able to see black crosshairs would be problematic at best. Not a huge fan of throwing a bunch of attachments on a gun but the Micro Laser is tiny and super lightweight. I’ve run into a roadblock as about 10 minutes after mounting and during the sight-in process it stopped working. Strange. I am sending it back for replacement and am confident I’ll have a new one mounted soon.

    A flashlight has yet to be added though I am considering an Inforce 200-lumen model. We’ll see.

    I have the standard trigger in the lower that came with the lower parts kit. It feels very good however an upgrade is likely in the near future. I’ve been using D&H aluminum magazines as well as PMAG’s – no issues.

    Reliability has been 100%. At a little over $800 invested I am loving the “Patriot” AR and glad it is part of my battery.

    Oh – the small American flag perfectly located on the right side of the lower? Amazon.

    Rourke


  • Freedom Ordnance FX-9 from Classic Firearms

    Freedom Ordnance FX-9 from Classic Firearms

    Pistol caliber carbines are becoming more and more popular in the firearms market. Back in the 90’s I had a Marlin Camp 9 and that 16″ barrel certainly added some zip to that 115-grain 9mm round. Sending cans up in the air at 50 yards down at the sand pits was what I called fun.

    Firearms have come a long way since then and AR’s in 9mm and even 45ACP are becoming more relevant. Freedom Ordnance has entered the pistol caliber carbine market with their FX-9 9mm Carbine.

    Classic Firearms, FX-9, Freedom Ordnance, 9mm, carbine, SHTF, review, test

    While the FX-9 may look like an AR pistol caliber carbine it is not. Freedom Ordnance designed the FX as a stand alone designed firearm that has many of the handling and operational characteristics of the AR-15 as well as a few parts that actually interchange. AR stocks and buffer tube assemblies are compatible with the FX-9. Most free float AR handguards will fit as well.


    Features:

    Classic Firearms, FX-9, Freedom Ordnance, 9mm, carbine, SHTF, review, test

    The buffer tube sports a UTG Pro 6 position stock. The stock features a nice pad on it which although not needed on a 9mm does help secure the stock and keep it in place on the shoulder. Nice added touch.


    Classic Firearms, FX-9, Freedom Ordnance, 9mm, carbine, SHTF, review, test

    The charging handle is fairly standard and no nonsense.  It cannot be replaced with a standard AR charging handle but it does operate the same. I like the “Freedom Reigns” on it. No issues. It works.


    Classic Firearms, FX-9, Freedom Ordnance, 9mm, carbine, SHTF, review, test

    Looking at the FX-9 it is obvious it was modeled after the AR. The magazine release, bolt release, safety, grip, and even separating the upper and lower half are all AR. Someone used to working with AR-variants will be able to pick up the FX-9 and use it with no issues.

    Trigger is decent and typical mil-spec pull weight – around 6 pounds or so.


    Classic Firearms, FX-9, Freedom Ordnance, 9mm, carbine, SHTF, review, test

    Finish is smooth and consistent. This is no Daniel Defense but all anodizing and coatings look great.


    Classic Firearms, FX-9, Freedom Ordnance, 9mm, carbine, SHTF, review, test

    When I ordered the Freedom Ordnance FX-9 I thought the handguard was going to be made from a polymer. I was pleasantly surprised and very impressed with the 13″ free floating aluminum handguard. It is SWEET! It also features the M-Lock attachment system. One of the best I have felt.


    Function and Reliability

    Classic Firearms, FX-9, Freedom Ordnance, 9mm, carbine, SHTF, review, test

    The Freedom Ordnance FX-9 comes with 1 SGM 33-rd Glock compatible magazine. Throughout my testing, I had zero failure with the SGM magazine. It seems like a very high-quality magazine and very rugged. Truly a close copy of the standard Glock factory magazine.

    I shot 30 rounds through a Magpul Glock 17 magazine with no issues. The Magpul brand seems well built and fairly rugged. There is no inner metal insert for the feed lips but again – no issues in a limited test.

    The ETS Glock 17 magazines were horrible. Based on my initial introduction to ETS I could never recommend their pistol magazines. The problem revolves around a fairly inconsistent spring wind as well as the sides that bulged out. I could not use the ETS magazine. It fit extremely tight in the magazine well and would not function.

    The standard Glock 17 OEM magazine performed flawlessly – as expected.

    In total over 300 rounds have been fired through the FX-9 with zero malfunctions and zero issues. The FX-9 should prove to be extremely reliable as it has the benefit of a dedicated feed ramp.

    Freedom Ordnance FX-9, 9mm, SHTF, review, test

    Accuracy:

    I placed an old Walther red dot optic I had lying around on the Picatinny rail along the top of the receiver. Amazingly it was almost right on the money at 50 yards with no adjustments. After some fine tuning, it was a blast to shoot. Firing anywhere from 15 to 50 yards shots on a 9″ pie plate was routine. This is not from a bench I am talking off hand.

    Shots on steel provided instant feedback and the constant “ping”, “ping”, “ping” was very satisfying. This thing is a BLAST to shoot.

    Freedom Ordnance FX-9, FX-9, test, review, 9mm, carbine, 9mm carbine, SHTF, prepper

    SUMMARY:

    The Freedom Ordnance FX-9 is a fast-handling 9mm carbine that fits a variety of roles. For someone carrying a Glock 17 or 19 as a sidearm, the compatibility with both ammunition and magazines are a plus. Within reasonable ranges, the FX-9 could certainly fill the role as a self-defense gun both at home and out on the property.

    For those looking for a pistol-caliber carbine, the Freedom Ordnance FX-9 is an excellent choice.

    RECOMMENDED

    Available for $599.99 from ClassicFirearms.com.

    Rourke

  • VIDEO: How to Build an AR-15

    VIDEO: How to Build an AR-15

    It used to be very cost effective to build your own AR-15. With the aggressive pricing today, complete factory produced AR’s can be had so cheap there is little reason to build your own – other than you want to. Advantages to building your own AR-15 range from putting together something unique which you cannot buy from S&W to designing/building an AR that is specific to its intended mission.

    Many have chosen not to build their own AR’s as assembling all those pieces can be intimidating. The reality is for most builds it is a step by step process – much like baking a cake.

    The two videos below show the process for both the lower and upper parts of the AR.

    Time to have some fun!!!


    How To Build an AR-15 Lower


    How To Build an AR-15 Upper

  • BUDGET PRECISION: THE HUNT FOR A RIFLE

    BUDGET PRECISION: THE HUNT FOR A RIFLE

    The following was originally published over at PrepperRalph.com

    Back when I was first looking into a good bolt action, I was searching for something that would fulfill two important roles. One being mid to long range precision shooting and the other being an accurate hunting weapon.

    Inspiration

    Four years ago I had seen an article about building a budget “sniper” rifle. The cost of the actual rifle was supposed to be less than $500 with a total complete cost less than $1000. Now for most people back then, that was almost unheard of unless you went with something similar to a Mosin-Nagant or a heavily used “Pawn Shop Special”. There were several choices I could have gone with when it came to a well-used weapon, but I decided to go the new route. So then began my search.

    The Line-Up

    There were several rifles I had in mind already when I went into the search. They are listed:

    Savage Axis
    Ruger American
    Remington 783
    Marlin XL7
    Mossberg Patriot

    All five rifles that I listed were available from the $350-$550 range in pretty much any shop you happened to find them. The Savage Axis had been the first true budget bolt action to go on the market and the rest seemed to follow. Features tended to include a paddle style safety trigger, adjustable trigger pull weight, a polymer style stock, and a barrel that was secured to the receiver using a barrel nut instead of a direct threaded type. All of the rifles were accurate. The 783 was known for being a good shooting rifle, as was the Savage. I had recently owned a Mossberg MVP in 5.56 and found that at that time, my version wasn’t the most accurate. And finally the XL7. To this day almost five years later I’ve only seen one on a rifle rack for sale. I don’t know if that is a good thing or a bad thing. Then my neighbor at the time bought a Ruger American in .243 Win and I got to shoot it. I liked how smooth the bolt was, the fit and feel of the rifle, how lightweight it was, and I definitely liked how accurate the .243 was. I decided I would go with a Ruger, especially since it was the 2014 Guns and Ammo Rifle of the Year.

    Caliber Choice

    During this period of time, then President Obama was leading the world in civilian gun sales. It seemed that everytime someone burped a word about gun control there was a mass buyout of anything gun related. Mass shootings, the threat of terrorism, and many other threats sent the gun community into panicked buying mode. Going to the local gun shops yielded high-priced weapons and scarce ammunition since no manufacturer was able to keep up with the demand. If you remember, even the stupidly cheap .22LR had gone the way of the do-do, and when it was found, was so expensive to make it unrealistic to buy. Calibers such as 5.56/.223, 9mm, .38 Special, .308 Win, and .22LR were so hard to find, that many people quit shooting altogether. What was on the shelves were the out of vogue calibers – .243 and .270 Win, .30-06 Springfield, and a spattering of other less popular rounds. With this in mind, I went with .30-06 Springfield. It had fought two World Wars, Korea, and was still one of the most popular hunting rounds in the world. Even today in 2017, the .30-06 remains a favorite amongst shooters. Surely it was good enough to do whatever I might ask it to.

    The Purchase

    Black Friday was coming up now… I had spent the better part of 6 months looking and researching rifles and finally shooting them. A trip to Walmart found me a Ruger in .30-06. It was on sale for $400 at the time so I was well within my projected budget. To layaway it went. Here in SC on Black Friday it’s a sales tax-free day so no matter what you buy it’s not taxed. So began an ordeal of trying to get my rifle. I went back to the Walmart to pick it up and the manager had misplaced it. To say I was angry was an understatement. Two hours later with me finally threatening to call the DM, he brings out my rifle. I asked about a discount for the trouble and He knocked $50 off of the price since the other’s in the cabinet were now on sale. Since all he did was bring it down to the sale price that wasn’t good enough. After some coaxing he gave a “manager’s special” and I picked up my .30-06 for $280!!! After all the BS and all the waiting and the run around I finally had my Ruger.

    Scope

    During the same time, I had been researching good rifle scopes that would fit in the $200 or less range. Nikon, Leupold, and Vortex all had great choices. Vortex was still relatively new on the scene So it came down to the Nikon Prostaff and a Leupold Rifleman. Both could be had in the range of $150-$180. When it came to features, I wanted a 3-9×40 variable zoom, positive click adjustments and a fast focus in case of other shooters. I decided to go with the Nikon. $180 after tax brought the total package of the Budget Sniper project to $480 after adding a set of Weaver medium height rings to mount the scope…

    Completing the Project

    A rifle is a fine instrument for someone seeking to put food on the table or to protect the homestead. The only problem is carrying around an 8+ pound rifle all day gets tiring so I opted on a Blackhawk! sling at $20. Realizing that I would probably end up shooting from prone at the range or in certain hunting applications, another $40 got me a Harris type bipod. My rifle was now fully assembled with a total cost of less than $550 complete.

    Shooting

    The shooting was easy and smooth. With the Ruger’s light trigger pull, lack of creep, and the steadiness of my Harris style bipod, I was making good consistent shots every time as long as my marksmanship stayed on point. I’ve tried the three main bullet weights available for the .30-06 from 150-180 grain rounds. I found the bullet weights from 165-168 grains were the most accurate for my particular gun. Seeing as this was a budget build, I wanted budget ammunition. I went again to the local Walmart and picked up a box of Remington 165gr Core-Lokts and a box of Winchester 165gr Power Points. Both rounds shot great and were very consistent. The only difference I saw in performance was that the Winchesters printed about 1/4″ higher than the Remingtons. The cause I could only determine to be was due to a slightly higher velocity. There were no misfeeds or ejection issues.

    Long Term…

    I’ve had this rifle build now for over 4 years. It has remained my go to hunting platform and has continued to be highly accurate and extremely reliable. The bolt has a glass-like smoothness to it when cycled. The trigger has actually improved over the years of shooting it. All of that I guess should be expected considering the round count in the rifle. To my closest estimation, I’ve fired the Ruger almost 600 times. I practice with it often and typically shoot 40+ rounds every time I go to the range. Since purchasing the gun, I’ve since spray painted it a desert brown color. It was just the hardware store special rattle can treatment. After all…. It’s a budget rifle build.


  • Video: ATN THOR Thermal Scope

    Video: ATN THOR Thermal Scope

    The following video reviews the ATN THOR Thermal weapons system. Thermal represents a key move up to 24-hour surveillance capability along with the ability to target potential threats 24-hours a day.

    The THOR is what many would consider a “budget” thermal optic. Sitting right around $1,950 “budget” is not a word that comes to mind when I see that price but it is one of the least expensive thermal optics available.

    Very impressive weapons sight.


  • Taurus Millennium G2 9mm:  Rounds 461 – 660

    Taurus Millennium G2 9mm: Rounds 461 – 660


    The testing of the Taurus PT-111 G2 9mm continues with rounds 461 through 660. The goal of this project is to track the reliability and performance of the G2 through 2,000 rounds. No cleaning will be done however lubrication will take place each shooting session. Should the G2 begin to experience reliability issues with ammunition previously proven reliable then I will go ahead and clean it.

    Taurus G2, 9mm, pistol


    For this segment 200 rounds of “freedom seeds” was sent down range. No cleaning has been done so far, however, a couple drops of Rem-Oil were placed on the rails. A single failure was experienced. What occurred was in the midst of firing I pulled the trigger – there was a click – and nothing. I pulled the trigger again due to the G2’s double-strike capability – and the round(Winchester white box) did not fire. I ejected the round and the primer hit looked good. The round was then placed in another pistol and it did indeed fire.

    Beyond this issue which I deem ammunition related – the Taurus has remained 100% reliable. No failures to feed. No ejection issues.

    So – here’s the data through 660 rounds:

    300 rounds Winchester White Box 115-grain FMJ bulk pack

    160 rounds Independence 115-grain Aluminum case

    50 rounds LAWMAN 115-grain TMJ

    50 rounds Blazer 115-grain FMJ aluminum cased

    100 rounds Blazer Brass 115-grain FMJ

    There is a decent amount of buildup on the feed ramp and the chamber. Difficult to photograph I gave it a shot and you can take a look at the pictures below. Once I start to experience failures I will give it a thorough cleaning.


    1340 rounds to go…..

    Rourke

  • VIDEO: The 10mm Glock 20 SF – Loaded for Bear

    VIDEO: The 10mm Glock 20 SF – Loaded for Bear

    The Glock 20 SF in 10mm is one of the firearms I’ve always wanted and it just hasn’t happened yet. I remember when the 10mm first came out and it appeared that it would take over the defensive pistol field displacing the 45ACp and 9mm due to its ability to not only have a high capacity but also excellent power. Excessive recoil and a reputation for wearing guns out reduced the 10mm to mediocre to insignificant popularity.

    The Glock 20 was from all accounts the first reliable 10mm pistol and gained a good following. Some 25 years the Glock 20 is still made – in its SF format. “SF” stands for short-frame as Glock redesigned and reduced the grip with this model.

    The Glock 20 is popular with outdoor enthusiasts who frequents areas with bear and other potentially dangerous animals.

    The following video offers an overall perspective of the Glock 20 SF 10mm pistol.


  • Video: US MARINE –  The Truth About Thumb Over Bore!

    Video: US MARINE – The Truth About Thumb Over Bore!

    There’s not much that will create an argument more than asking “What is the best firing stance and grip?” in a forum of AR shooters. While everyone has an opinion and many feel their’s is the only one that counts I’ll give you my quick answer – “The one that you are comfortable with and allows rounds to be sent down range – accurately.”

    Pretty simple.

    Several years ago I heard of this method competition shooters were using to control recoil and shoot very accurately – called the “C-Clamp”. I tried and hated it. Man – it felt so uncomfortable. I preferred to hold the magazine well however I just could not control recoil well and get multiple rounds on target quickly. I had signed up for a defensive carbine and pistol course from Wolf-Fire Firearms Training and decided to try the C-Clamp again. I used it throughout the class and it really grew on me. Now, this is the primary method I use for shooting the AR.

    The video below gives some perspective on the “thumb over bore” and explains my position on it well. I agree with this guy 100%.


  • Rebates in the Firearms Industry Provides Excellent Deals

    Rebates in the Firearms Industry Provides Excellent Deals

    There is a “Rebate Storm” going through the firearms industry as manufacturers compete for dollars. Smith & Wesson started this trend and several others have jumped on the bandwagon. IThis is a great time to take advantage of a consumer-driven market.

    The list below provides links and information for many of the rebates currently active:

    Bushmaster Firearms

    Century Arms

    DPMS

    Honor Defense

    Marlin Firearms

    Remington

    Savage

    Smith & Wesson

    Know some friends that like to shoot? Share this post with them. Spread it on Facebook or wherever.

    Take care all.

    Rourke


  • Taurus Millennium G2 9mm:  Rounds 361 – 460

    Taurus Millennium G2 9mm: Rounds 361 – 460

    The testing fo the Taurus PT-111 G2 9mm continues with rounds 361 through 460. The goal of this project is to track the reliability and performance fo the G2 through 2,000 rounds. No cleaning will be done however lubrication will take place each shooting session. Should the G2 begin to experience reliability issues with ammunition previously proven reliable then I will go ahead and clean it.

    9mm, Taurus, reliability, test, SHTF, CWP, self defense

    Rounds 1 through 360 can be read about HERE.

    For this segment 100 rounds of “freedom seeds” was sent down range. No cleaning or lubrication has been performed thus far though some gun oil will be applied next session. No failures of any kind have been experienced. The Taurus has remained 100% reliable.

    So – here’s the data through 460 rounds:

    200 rounds Winchester White Box 115-grain FMJ bulk-pack

    160 rounds Independence 115-grain Aluminum case

    50 rounds LAWMAN 115-grain TMJ

    50 rounds Blazer 115-grain FMJ aluminum cased

    Taurus PT-111, G2, 9mm, carry pistol, performance, reliability,

    Result: 460 rounds. Zero issues – no malfunctions.

    Upcoming I will introduce some hollow point ammunition and expect issues may be had. I have heard that the G2 will not reliably feed some defensive hollow point ammo, so we’ll see what happens.

    The Taurus PT-111 G2 9mm is one of the least expensive pistols on the market and an option for the budget-minded looking for a carry pistol. Is it reliable? We are well on the way to finding out.

    1540 rounds to go……

    Rourke